Guest Blog: After the repair- are we done? Post repair workflow
What do we do after the repair is complete? Pull the vehicle out and grab another repair order, right? I am quite sure there are some folks that do exactly that. So, what should you do? To quote Yul Brynner from the musical, The King and I, “tis a puzzlement.” The fact is, there should be a standard workflow for post repair, just like there is a workflow for the diagnostic path.
I have mentioned in previous articles that I spent some time at a Datsun dealership early on in my career. As an apprentice, I worked next to a Master Certified Datsun mechanic named Bill (we were not referred to as technicians in those days.) Bill taught me a couple “after the repair” tips that I have never forgotten.
One day, he had completed a tune-up, (remember we are talking late 1970's), then he called me over to teach me these two tips:
-
Bill said, “Keith, grab a light and look down the barrel of the carburetor while I push the gas pedal to the floor.” He asked me if the throttle plate was wide open. I hollered back, “no, it isn’t.” He said, “come around here and watch this.” He grabbed the gas pedal and pulled it away from the floorboard fairly hard. Then Bill said, “peek down the barrel now.” Sure enough, the throttle plate was 100 percent open when he pushed the pedal to the floorboard. He asked me if that would make a difference in performance when the driver “floored it?” I said, “heck yes, quite a lot.” It seems that as the accelerator cable stretches over time, it needs to be “reset,” pulled back into place by adjusting the cable brackets, to give it top performance. He said, “Keith, in your career, try to do things that the customer will be impressed with. When a mechanic gains a following, their value increases substantially.” Wise words!
We also sent each vehicle to the wash bay after the repair. Let’s face it, a clean car feels like it runs better, right? The shop that services my wife’s truck does that and of course she is thrilled.
- Bill explained to me with a mischievous grin that the very last thing you do right before you drive the car out for the customer is this: Bill reached down and moved the driver’s seat forward around one inch. I laughed thinking he was pulling my leg. He was only halfway joking because he moved the seat on every vehicle with a drivability issue or a tune up. I said, “Bill, what in the world do you do that for?” He says, “Keith, that gas pedal is one inch closer to the driver’s foot. So, when the customer steps on it their foot hits the pedal sooner and the car takes off like a rocket, and they say to themselves, that Bill sure is good! Oh my, the brakes work better as well!” You all laugh at this, but I bet everyone reading this will try it tomorrow.
When we checked the customer out, we would review a complimentary bumper-to-bumper visual inspection we had performed. Customers always feel good knowing that a professional mechanic has looked everything over.
So, what should we be doing after the repair, 45 years later? There are definitely some things that are nice for customer service that some might even find impressive, like a complimentary wash and vacuum. However, depending on the OEM, today’s vehicles require that a few other tasks be performed to avoid a comeback, which could cost you time and profit, and maybe even your customer.
It is vitally important to make sure the issue the customer brought the vehicle in for is completely resolved. To do this we must always validate the repair.
First, we need to find out if we need to reset or relearn anything based on what the repair was. Not doing this would likely result in a comeback.
A great example of needing to reset/relearn is cleaning or replacing the throttle body on a Nissan (see below).
Times have changed since Bill would literally bend the throttle cable brackets to “reset” the throttle years ago. The vehicle’s computer handles that today.
I am using Nissan as an example here, but a learn or relearn after cleaning or replacing the throttle body is necessary on most vehicles.
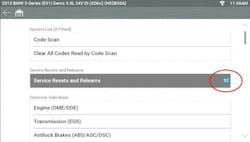
The challenge with this is knowing what reset/relearns might be required based on the repair and the VIN specific OEM, because there could be 50 or 60 or more to choose from. Snap-on scan tools that have Fast-Track Intelligent Diagnostics capability, filter it down to only the resets needed for the specific trouble code. If there isn’t a code and you are using either a ZEUS, TRITON, or an APOLLO, you can select “Service Resets and Relearns” button and select whatever you need. Everything is in one place, so you don’t have to look in each module in the network. You can see below that the BMW example in the image has 52 resets and relearns available.
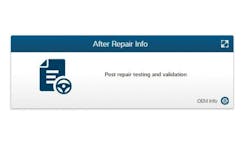
There may be a need for the reprograming of a module (re-flash,) after a repair. A repair information system like ShopKey Pro or Snap-on Repair information will have that information under component remove/replacement, or after repair information.
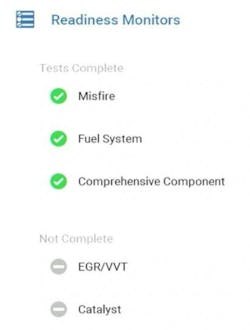
We are ready to clear all codes, then go for a test drive. We will refer to it as a “drive cycle” because when done correctly the vehicle’s computer will tell us if the problem is solved or not. OBD-ll has Readiness Monitors which I think of as simply a self-test of certain systems. Certain criteria needs to happen during the drive cycle in order for the self-tests to complete. It is worth the time to refer to your repair information system to know what is required for the component you replaced.
Here’s an example of this: Once the drive cycle is done, I will need to do a post-scan to make sure the code did not come back. Secondly, I need to make sure the self-test was complete. If the repair was to the fuel system and no code returned, I can rest assured that the repair was successful. If the repair was the EGR valve, I cannot be certain until I do the drive cycle as instructed. I would have saved a lot of time if I had looked up the drive cycle procedure prior to the drive. When the tests are complete, we have validated the repair.
Before the repair I am sure you performed a pre-scan that would have checked all the modules in the network for trouble codes and that will be stored in the Snap-on Cloud for review. The post-scan automatically goes to the cloud as well, so it’s really easy to show the customer before and after repairs. On top of that, the diagnostic health scan will make a customer feel good just like the bumper-to-bumper visual check Bill and I used to do.
After this successful post repair workflow, we are ready to go to the wash bay and then adjust the driver’s seat.
About the Author

Keith Wray
With over 45 years of experience in the automotive industry, Keith Wray started his career as a technician/automotive machinist and worked his way up to a service manager for an OEM dealership. He currently serves as the national training manager for Snap-on Diagnostics where he co-develops training materials as well as conducts technical courses for franchisees, employees, end-users, and vocational students.
