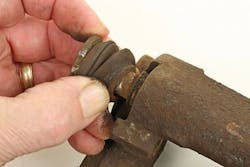
Check the bleeder valve. If you suspect a bad caliper, it may be an issue with sticky/seized piston(s), but don’t jump to that conclusion right off the bat. You may have an issue with the bleeder valve being contaminated, not allowing free fluid flow. Remove the bleeder and check for rust, debris in the transfer hole, etc. Use a pick to see if any debris is inside the passage and blow with compressed air. If the valve was or still is blocked, that may have been the problem (or at least part of the problem). Replace or clean as needed and retest the caliper.
Initially, inspecting the caliper can be done by removing only one of the caliper mounting bolts. This allows you to pivot the caliper up and away from the brake disc without the need to completely remove the caliper.
The most common issue that results in caliper sticking or seizing is corrosion or debris at the piston(s). If the piston dust boot is damaged in any way, road debris can enter and prevent the piston(s) from freely moving in/out. If the dust boot is damaged, don’t even bother wasting time with further diagnosis. Replace the caliper with a new or reman caliper. Keep in mind that internal corrosion is often caused by moisture in the brake fluid, which can result from airborne moisture entering the fluid over time. Moisture (water) contamination degrades the effectiveness of the brake fluid, lowering its boiling point. If you suspect water contamination, flush the brake hydraulic system and refill with fresh fluid.
Even if the pin boots appear to be good, always check for ease of pin movement. If the pins do not move freely, disassemble, clean and if pins are pitted or show wear, replace them. Always install new pin boots.
With the caliper hoses pinched off (using the proper tool to prevent hose damage), connect a clear hose to the bleeder (with the other end of the hose into a containment bottle), loosen the bleeder and compress the caliper piston(s) using a caliper piston compressor tool (or large channel locks, being careful not to gouge the piston face). If the piston(s) is difficult to compress and the condition of the bleed screw has been verified), the piston(s) are dragging in the bore, likely due to corrosion. If this is the case, replace the caliper. In today’s market, it’s usually cheaper (and definitely faster) to replace a caliper as opposed to rebuilding.
Inspect piston and piston seal condition. If seals are ripped, cracked or otherwise damaged, moisture contamination inside the piston bore is likely. Also, if the brake pads were severely worn down, the pistons have been placed further out in the bores. When the pistons are retracted (pushed back into the bores), a rusted/contaminated surface may now force a contaminated area to operate into an otherwise clean bore surface, potentially causing piston sticking. The best option, rather than attempting a rebuild, is to simply replace it with a new caliper. Also, it’s best to always replace both calipers on the same axle.
Caliper Hardware
Condition of caliper hardware is critical and is sometimes ignored. Hardware, depending on design, can include tabs that locate brake pad ears, and/or springs that are meant to stabilize the pads. Although this hardware is made of stainless steel, that doesn’t mean that tabs or springs are lifetime components. Springs can fatigue due to mileage, heat and corrosion, and tabs can wear, distort and/or be damaged by debris and lack of lubrication. Although the tabs may be made of stainless steel, when affixed to iron or aluminum brackets and calipers, rust or corrosion may build up between the tabs and mounting surfaces. Whenever servicing calipers or pads, always replace all caliper hardware. Make sure that all mounting surfaces are clean and free of rust and debris. Once tabs are installed, apply high temperature brake grease to the tab surfaces that contact the brake pad backing plate ears to facilitate free movement.
Fixed vs. Sliding Caliper
Brake calipers contain one or more pistons that extend from their bores in order to push the brake pads against the rotor disc under hydraulic pressure. Two common caliper designs are used that accomplish this task. A “fixed” caliper features pistons on each side of the disc. The caliper body is rigidly mounted and does not move. Hydraulic pressure acts upon the inboard and outboard pistons simultaneously with hydraulic brake fluid entering one side of the caliper and extending to the other side via external transfer tubes, allowing fluid to flow to the inboard and outboard pistons at the same time.
Depending on designs, some brake pads will feature expander springs, which help to pull the pad friction surfaces from dragging on the rotor disc. If the springs are rusted, the fatigue resistance is diminished, and they can easily break. Always replace pads and/or caliper hardware during any brake service.
“Floating” or “sliding” calipers feature a piston on only one side of the caliper. The caliper body features sliding pins. As the piston extends from its bore on one side of the caliper, the brake pad being pushed by the piston contacts the disc, instantly forcing the opposite pad to contact the disc as the caliper body “slides” toward the disc opposite the side that features the piston.
Whenever lubricating sliding pins and brake pad sliding surfaces, use a lubricant that is specifically designed for brake applications. These specialty silicone lubes are designed to handle typical braking system temperatures.
The importance of using new hardware cannot be over-emphasized. With the caliper or caliper mounting bracket properly cleaned and the slider hardware properly lubricated, pads should be able to move along their in/out path freely and unobstructed.
If an issue exists with fixed calipers (brake pads won’t extend, or brake pads drag on the disc), the issue involves either a restriction of hydraulic fluid (kinked or collapsed brake hose or debris in the hydraulic circuit), or with pistons not being able to freely move due to corrosion, debris or damage to the pistons and/or the piston bores.
Anti-vibration shims that feature an adhesive side (to be secured to the pad backing plates) are commonly included with new pad sets. Shims are sometimes pre-installed to the pad backing plates for convenience.
If the same operating concerns are evident with a sliding caliper, especially if either the inboard pad shows greater wear than the outboard pad, or vice-versa, this is likely due to the caliper not being able to freely slide on its pins. Sliding pins may have lost their lubricant and/or may have become rusted. Remove each pin and examine for rust and/or pitting. Also, each pin features a bellows type dust boot. If the boots are torn or damaged, this can allow water and road dust to contaminate and damage the pins. If sliding pin contamination is evident but minor in nature, you may be able to clean the pins (degrease and clean with scotchbrite or steel wool and rinse), then lubricate with fresh brake caliper grease and reinstall.
Lube clean/new sliding pin components prior to installation.
However, if pin and/or pin boot damage is evident, the best course of action is to replace with new boots and pins, adding grease prior to pin installation. And don’t use just any grease that may be available. Use only a dedicated brake caliper grease that is specifically designed to handle the high heat conditions encountered during brake application. Also, do not over-torque sliding pins or caliper mounting bolts. Always follow the vehicle manufacturer’s torque values.
When installing new pad hardware, lightly lube the exposed surfaces of the stainless steel pad guides. Avoid excess application to prevent lube from contacting pad friction surfaces. Apply sparingly.
Fixed calipers mount rigidly to a caliper bracket, usually part of the spindle assembly. Sliding calipers also mount to a separate bolt-on bracket, with the bracket featuring threaded mounting holes that retain the sliding pins. After removing a caliper from its bracket, in addition to inspecting and servicing the caliper, it’s also important to service the bracket. Remove the bracket and thoroughly clean of any rust, debris and contaminants. Either style of caliper requires a clean and even mounting surface where it mates to the bracket. If a bracket is bent or creates an uneven mounting surface to the caliper, the caliper will be out of parallel to the brake disc, which will result in uneven pad contact. Uneven contact prevents use of a full contact patch at the disc, resulting in less than optimum braking performance and premature tapered wear of the pads. The same caution applies to fixed calipers. Be sure to clean all mounting surfaces to remove any rust buildup or burrs, which can place the caliper out of parallel to the rotor disc.
Brake pads that feature compression springs keep the pads riding on their slider guides. The caliper body contacts the springs, forcing the pads to remain on their guides. Make sure that the caliper surface where spring contact occurs is clean and free of rust scale.


