When multiple problems exist in an inoperative refrigerant loop, the stride for accuracy becomes even more of a challenge.
When it comes to A/C diagnostics, it’s pretty straightforward. Like addressing any other system in the vehicle, having the right tools for the job, adequate service information, and the know-how to approach the system in question is always the right approach.
But, what happens when the system in question has more than one issue? How do we alert the customer accurately, the first time? Sometimes we can’t. It’s this same scenario that drives techs insane and typically is the cause of much frustration and lost revenue.
The initial approach
My good friend, Rick, faced this very same challenge not too long ago. The subject vehicle was a 2015 Chrysler Town and Country van with 185,000 miles on the odometer and the complaint was that the automatic A/C wasn’t performing correctly (Figure 1). Like many minivans of today, this one was also equipped with rear zone A/C.
The initial approach was typical. The system was evaluated preliminarily, and the A/C compressor was found to be inoperative. This led to a system pressure test proving the refrigerant charge was significantly low.
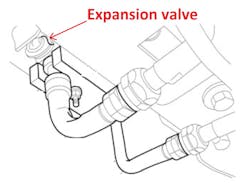
Further investigation found a leaking rear expansion valve at the rear evaporator core. After consulting with the customer about the suggestion to include the replacement of the rear evaporator core, the customer concurred, and both components were replaced (Figure 2). The compressor oil was balanced, and the system was evacuated and charged to specification.
However, upon delivery of the vehicle, the compressor had become very noisy. Further analysis pointed to a faulty compressor clutch pulley bearing. Due to the cost of clutch assembly replacement and the age of the original compressor, Rick installed a replacement compressor as an assembly.
A shot at redemption
This is where things start to go awry. With the replacement of the fixed displacement A/C compressor assembly and rebalancing of the oil, Rick followed up with a generic A/C system performance test. Meaning, he evaluated the pressures at idle, vent temperatures, and factored in the ambient conditions.
The results of the test at idle are as follows:
- Ambient Temperature: 82 F
- Outlet temperature: 78 F
- Low-side pressure: 80 psi
- High-side pressure: 150 psi
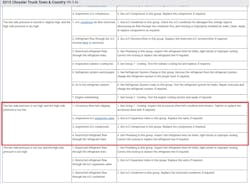
This is the point when Rick reached out to me for input because he wasn't happy with the outlet temperatures at the vents. After hearing of the saga, I told Rick that I agreed the outlet temperatures were subpar and there is definitely an issue that must be addressed. I suggested that he reference and follow the published A/C performance test in service information for this vehicle specifically (Figure 3). As can be seen, it appears the new A/C compressor is not pumping refrigerant efficiently. But is it the fault of the compressor or is there an underlying cause?
Every vehicle has specific test criteria and for good reason. For one, we must always factor in the current ambient conditions. Temperature, sun load, heat load and humidity all affect the performance of the A/C system. Also, a smaller vehicle has less mass than a larger one. This means the larger vehicle holds more heat energy. Although some tests are more stringent/accurate than others, following the vehicle-specific A/C performance test takes all those factors into account and levels the playing field to obtain more accurate test results. Besides, they typically offer a correlation chart that compares pressure/temperature and makes suggestions toward likely failed components or areas of malfunction in any area of the HVAC system (Figure 4).
According to the chart, there are a few possibilities:
- A slipping belt would prevent the compressor from working efficiently.
- A faulty expansion valve would not modulate/throttle the refrigerant properly.
- The new compressor could be faulty/low displacement.
- A restriction in the refrigerant lines could create a pressure drop and performance issue.
Each one of the above bullet points could be very likely, especially due to the age of the vehicle and the previous failures/replaced components. The question I posed to Rick is what test could we do to help eliminate one or more of the possibilities above?
Hindsight is always 20/20
Although Rick was a victim of circumstance — meaning, he did nothing wrong — this was his shot at redemption. In hindsight, Rick could have charged the original leaking system to specification and upon conducting the performance test he likely would have witnessed the symptoms and test results he was currently experiencing. Then again, the vehicle did leave the shop with a properly performing A/C system, so all bets are off.
What I was alluding to above when I questioned Rick about a different approach to eliminate possibilities, the “touch test” came to mind. Because the refrigerant loop operates off principles that dictate how temperature and pressure relate, with a topological layout of the refrigerant loop’s configuration we can anticipate the temperature of the components at any given spot in the loop.
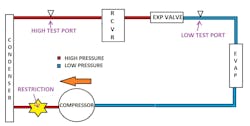
With that, if an issue like a restriction existed, the correlating pressure drop of the circulating refrigerant would yield a temperature drop across that restriction. There would be a significant temperature change and it would be easily sensed by hand, through the touch test (Figure 5).
As demonstrated by the colors blue and red, these colors truly represent pressure zones but also the temperature we should anticipate during the touch test (Red, being hot and blue, being cold). This diagram reflects the configuration of this vehicle’s system topology.
Starting to the left of the compressor is the outlet. The compressor outputs a hot, high-pressure gas into the discharge hose and then travels through the condenser. As it does so, heat energy radiates from the hot gas allowing it to condense into a liquid. The hot, liquid refrigerant leaves the condenser in the liquid line and travels through the receiver/dryer which acts like a reservoir for the liquid refrigerant. After that, the expansion valve serves as a restriction and creates the necessary pressure drop allowing two things to occur. The hot, high-pressure liquid refrigerant becomes a cold low-pressure liquid.
As the cold liquid refrigerant makes its way through the evaporator core, which is located in the cabin, it absorbs heat from the cabin and boils off into a gaseous state once again. As this occurs the refrigerant absorbs the heat energy from the cabin and allows the cabin to cool. The compressor will draw the cold gas in and pressurize it to repeat the cycle.
Putting the game plan into action
Rick ran the system and began his touch test. Almost immediately Rick found his issue as he burned his hand when placing it on the discharge hose — between the compressor outlet and the condenser inlet. This is indicated by the yellow star in the diagram.
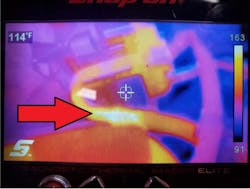
The question then becomes, “If there is a restriction on the high side of the system, why is the high-side pressure not extremely elevated?” This is where system configuration comes into play. But we will first prove the location of the restriction using a thermal imager. This will offer something visible to show the customer and to document on the repair order.
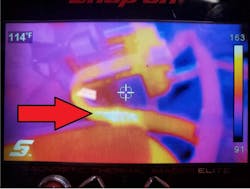
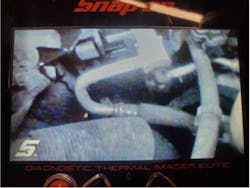
The combination/Siamese discharge hose and liquid line are shown. The bright white area in the image indicates the location of the restriction in the discharge hose (Figures 6 and 7).
The picture is worth a thousand words. We know the hose isn’t physically damaged on the outside, so it has either internally collapsed or there is debris in the hose. The reason high-side pressure is not very elevated can be seen in the topology diagram. The high-side test port is downstream of the restriction. If it was upstream of the restriction, the diagnosis would’ve been swift and simple. These simple observations are frequently overlooked by technicians, and they tend to assume every high-side restriction will cause a pressure increase. It truly depends on the location of the restriction relative to the test port location.
Removal of the hose allowed Rick an opportunity to push shop-regulated air through the hose. He captured metal shavings from the hose that likely came from the compressor. But was it the original compressor or the replacement compressor that dumped the metal shavings into the system?
At this point, I will give you my opinion. Experience tells me that metal is very difficult to get out of a refrigerant loop. With that, I would recommend a total system replacement. I am being ignorant of cost and simply stating that is the safest way to properly repair the vehicle. Rick has a few other points to factor in though.
For one, he warranted the new compressor with another replacement. Two, he replaced the condenser along with the Siamese refrigerant line (as there is no way to guarantee no metal resides inside it). Three, he replaced the receiver/dryer (containing the sack responsible for removing/trapping moisture from the refrigerant) as the metal particles tend to cling to it.
Again, I will state that it is a gamble because any remaining metal can circulate in the repaired system and wreak havoc. But it doesn’t mean it’s an improper or incomplete repair. Even if Rick recommended full component replacement, the choice is up to the customer. After repair, a subsequent A/C performance test proved the system functioned as designed and the gamble paid off. Here are the results:
- Ambient Temperature: 82 F
- Outlet temperature: 48 F
- Suction pressure: 42 psi
- Discharge pressure: 181 psi
Automotive Autopsy
After disassembly, Rick noticed that the first replacement compressor had a bit of drag to it as he manipulated it by hand. This was likely the culprit that dumped the metal into the system. Reflecting on our A/C system performance test, even if Rick replaced the restricted hose, a repeat test likely would have failed. The metal shaving from the compressor would reduce its ability to pump refrigerant and the symptoms of low displacement would have been exhibited. (High suction pressure/low discharge pressure).
My point is that even following procedure can still lead to tough roads ahead. But being creative with the tools you have, your knowledge of how the components of the system function, and what to expect from the derived test results can serve as a supplement to good service information. The combination of the three serves as the three legs of a stool to keep you upright in almost any situation. Persistence pays off!
Get creative with tools like the thermal imager. The thermal imager detects infrared heat energy. Any object that is warmer than absolute zero emits infrared radiation. The further from absolute zero the surface temperature of the measured object is, the more infrared heat energy it will emit. Capitalize on this and use it to your advantage when possible.
Reference service information and determine the system’s topological layout before troubleshooting issues via a performance test. Not only will the test results make better sense to you, but you will have a greater understanding of how the individual components work together as a system.
All of these skills and techniques come together and will help you become a better technician overall.
About the Author
Brandon Steckler
Technical Editor | Motor Age
Brandon began his career in Northampton County Community College in Bethlehem, Pennsylvania, where he was a student of GM’s Automotive Service Educational program. In 2001, he graduated top of his class and earned the GM Leadership award for his efforts. He later began working as a technician at a Saturn dealership in Reading, Pennsylvania, where he quickly attained Master Technician status. He later transitioned to working with Hondas, where he aggressively worked to attain another Master Technician status.
Always having a passion for a full understanding of system/component functionality, he rapidly earned a reputation for deciphering strange failures at an efficient pace and became known as an information specialist among the staff and peers at the dealership. In search of new challenges, he transitioned away from the dealership and to the independent world, where he specialized in diagnostics and driveability.
Today, he is an instructor with both Carquest Technical Institute and Worldpac Training Institute. Along with beta testing for Automotive Test Solutions, he develops curriculum/submits case studies for educational purposes. Through Steckler Automotive Technical Services, LLC., Brandon also provides telephone and live technical support, as well as private training, for technicians all across the world.
Brandon holds ASE certifications A1-A9 as well as C1 (Service Consultant). He is certified as an Advanced Level Specialist in L1 (Advanced Engine Performance), L2 (Advanced Diesel Engine Performance), L3 (Hybrid/EV Specialist), L4 (ADAS) and xEV-Level 2 (Technician electrical safety).
He contributes weekly to Facebook automotive chat groups, has authored several books and classes, and truly enjoys traveling across the globe to help other technicians attain a level of understanding that will serve them well throughout their careers.
