Servicing an A/C system has become so much more than hooking up an automatic A/C machine and walking away until it's done. An A/C service, like other vehicle services, starts with a solid developed process and the right tools. Having the right tools and training along with your process will reduce comebacks, streamline efficiency, and reduce downtime for analyzing and testing A/C repair-related issues. Let's dive in and discuss the need for the proper tools and processes for successful A/C repair!
Before hooking up any tools, a full analysis of the vehicle's A/C system is needed to determine the system's design and expected performance. When performing an A/C repair to solve a performance issue, always start with using the OEM service recommendations for testing the system efficiency compared to what the manufacturer outlines as the expected result. A vent temperature output is only a small part of determining a system’s performance and cannot be the sole barometer of the system’s ability to work correctly.
What's new with modern A/C systems
Before we jump into the correct tooling and processes, let’s be clear about how A/C systems have changed over the years, the scariest part about automotive A/C systems is: “You don’t know, what you don’t know!” The physics of air conditioning systems has remained unchanged, but the application of those technologies has changed a lot. The use of thermostatic expansion valves, isolated water-cooled A/C condensers, integrated heat exchangers, moisturized passenger area air condition systems, active grille shutter systems, high voltage or mild hybrid electric compressors, and all the other technologies are now used to increase the efficiency of systems. Those additions or novel uses have really increased the need to closely read and follow the A/C systems design and service precautions. Yes, we must know how it works to fix it. Keeping these changes at the forefront of the process is the key to knowing what tools to buy, and what tools may not be a part of what a successful repair looks like.
Deciding on what tools your shop should have for repair and diagnosis of air conditioning systems is a mixture of what vehicles you work on, and what types of repairs or failures your shop encounters often or is expected to encounter. Looking at the mix of average vehicle years you repair as well as the mixture of luxury, European, and commuter cars and trucks.
Looking at diagnostic tools to make the analysis part of A/C repair easier, opens a wide door of options. We start by looking at the tools used to measure our baseline of the A/C system before we start a repair.
Inspect before you diagnose
Often as technicians we are pressured to hook up the A/C machine, evacuate the system, and weigh the refrigerant in it before we even access the system, this usually is not the most effective way to start. A good visual inspection and reading all of the codes throughout the entire vehicle is a productive first start to any repair, you never know if the A/C performance or lack thereof is due to a vehicle's management system reducing the capability due to a code from a failed or skewed input or other seemingly unrelated issue.
Case study: 2010 Ford F-150
A great example of this is our shop had a 2010 Ford F-150 come in with a complaint of the A/C only blowing hot. Upon initial inspection that was, in fact, the case; I noted that the compressor did not come on as well when commanded at the dash.
Our process has us start with a visual inspection; no apparent leaks were found. An A/C machine was used to confirm that the static pressure in the system was sufficient for the compressor to engage. We performed a full scan of the vehicle’s modules for codes. There is a multitude of scan tools out there. We have factory Ford tools but our initial pre-scan of an A/C diagnostic may not quite rise to the occasion of needing Ford IDS, so we grabbed an Autel Maxisys MS906 scan tool to retrieve codes. The Autel unit gives us a very OEM-like menu and navigation, as well as OEM-compatible coverage, giving us the information we trust to diagnose the car.
The HVAC control module had a code of B10B9-14 for a short or open in the blower motor's control circuit. The blower motor operates so you may dismiss the code as an unrelated issue that does not matter.
Ford’s service information states to diagnose all other HVAC DTCs when the compressor is commanded and does not activate. A quick look at all the other data in the car led us to believe this DTC may be the cause as all obvious inputs to the modules were reporting correctly for the compressor to activate, but the compressor command showed “no”. We found that the B10B9 DTC was the cause for the compressor being inhibited.
Tools for taking temps
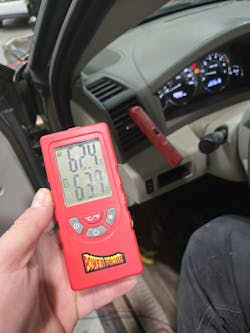
I don’t know about you but I have lost a countless number of dash vent-mounted thermometers over the years, at this point a high percentage of vehicles in Tulsa may have a thermometer that at one time belonged to me in the vent. We have switched to using the Power Probe temperature kit (PPTEMPKIT) with the additional temperature probe (PPTEMPPROBE) (Figure 1). This allows us to take an ambient temperature measurement and vent temperatures from both sides of the vehicle or even front and rear at the same time. Having that vent temperature compared to ambient is integral to following each manufacturer’s A/C performance test that is outlined in service information. Being that each probe is wireless takes the ease of use to a new level.
An A/C machine for every vehicle
As technology advances, we still see the improvement made on equipment for older systems, we have added a Snap-on EEAC333B Polartek YF machine to our shop for any HFO-1234yf vehicles, it lacks the onboard oil injection our R-134a machine has so it is perfectly suited for use on hybrid vehicles as well. Even with HFO-1234yf now being the lion's share of A/C work we do today, that didn’t stop us from updating our R-134a machine too. We were so impressed with the Snap-on YF machine that we updated our R-134a machine to the Snap-on EEAC331B Polartek Plus unit, this unit does have onboard oil and dye injection so it’s not our recommendation as a sole unit for those shops that do any A/C work on hybrid vehicles of the older vintage still using R-134A.
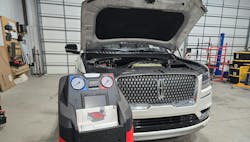
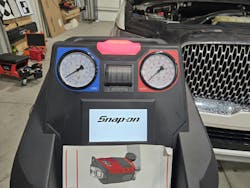
The Polartek Plus unit (Figure 2) used in the Ford example above has a Wi-Fi database that can be easily updated for vehicle refrigerant specifications, and a very powerful 6 CFM vacuum pump that makes quick work of an evacuation job. There are many great A/C machines on the market, but we have a great relationship with our Snap-on rep. He carries paper for the on-board printer that is on each of the machines and stocks a filter for each of the machines we have purchased. Locally we have a family business that has been servicing all Snap-on's equipment for three generations as well, making it the obvious choice in our market.
Finding the leak
When we look past the A/C evacuation and recharge phase of the repair, leak detection tools are at the top of my mind, a good quality UV light will go a very long way before we must drag out the big guns like our ATS Bullseye Leak Detection Kit. The UV light is one of the most cost-effective ways to springboard your leak detection capabilities forward. We opted to outfit our A/C service cart with the OPTI-PRO UV Max R flashlight kit, it’s rechargeable and has a very strong light, the optic at the end is adjustable so it can be focused intensely to one area or broadened to cast the UV over an entire engine bay. We have tested many UV lights over the years, and the Tracer Products unit is fantastic.
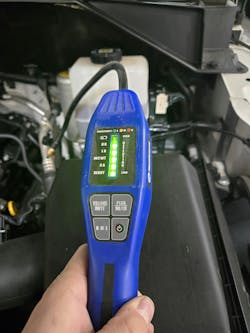
During the recharge phase of a repair on any system, but specifically, is required on any HFO-1234yf system repair is an electronic leak detector; I still call it a sniffer. I find that many technicians are using older sniffers that do not meet the SAE J2913 minimum specifications for HFO-1234yf refrigerant. Those units that meet the SAE J2791 specification for R-134a systems are a fraction of the cost but are inadequate for the leak detection standards of today. We use the Mastercool 55900 Probe-Type Leak Detector (Figure 3) that meets both those specifications as well as the European EN14624 standard, not to mention the unit is made in the USA. We find this unit has a longer use life and is significantly more robust in a shop environment than the other units we have had over the years. The touch buttons have a really good quality membrane that lasts longer than the competitors' products we have had. Not to mention it does a very good job of detecting leaks in under hood locations that other detectors just seem to miss.
The use of a leak detector that meets the SAE J2913 standard is the preferred method of detection if your A/C machine detects a gross leak during the initial decay test. Even if a vehicle passes that decay test, it is still good practice to inspect any areas that have been touched during the service with an electronic leak detector, it also allows you to capture the information in a picture so you can add it to whatever flavor of digital vehicle inspection you chose.
Overall, no matter what tools you choose to perform A/C repairs, remember to ensure that they meet the minimum SAE specifications for the A/C system type you are servicing. When dealing with the mildly flammable HFO-1234yf gas, which may not be as dangerous as it was made out to be, safety should still be a primary concern. Having the right tools for the job not only makes it easier, but more accurate and profitable in the end.
Tools used
- Autel Maxisys MS906 scan tool
- Ford IDS
- Power Probe Temperature Kit, No. PPTEMPKIT with the additional Temperature Probe, No. PPTEMPPROBE
- Snap-on Polartek YF Machine, No. EEAC333B
- Snap-on Polartek Plus Machine, No. EEAC331B
- ATS Bullseye Leak Detection Kit
- Tracer Products OPTI-PRO UV Max R flashlight Kit
- Mastercool probe-type leak detector, No. 55900
About the Author

Keith Perkins
Keith Perkins has been in the industry for over 19 years, serving in various capacities, including engine machinist and assembler, dyno tuner, diagnostic technician, instructor, technical information specialist, repair technician, and many more roles through the years.
Currently, Perkins co-owns and operates the L1 Automotive Group with his wife. The L1 Automotive Group is comprised of three companies: L1 Automotive Diagnostics and Programming, Level 1 Automotive, and L1 Automotive Training.
Perkins currently holds the title of ASE Master Certified L1 Technician and ASE certifications A1-A9, L1, L4, X1, P2, xEV Level 2, and various other industry certifications. He also serves as a Subject Matter Expert for the ASE A1, A2, A7, A8, L1, and L4 tests.
Perkins has served on the Board of Directors for NASTF since 2023. He enjoys spending time with his wife of 18 years, Liz, and his two daughters, Rylynn and Bailey, in his off time. His favorite non-automotive activity is skydiving!