Blog: How to properly use and maintain induction heat coils
Induction heating coils that transfer heat from induction tools to the objects being heated are critical elements to the process of releasing rusted or seized hardware from corrosion and thread lock compounds.
If you just purchased a tool with induction heating coils but aren't sure where to begin, contact an induction heating expert to help you select the perfect coil for your application.
Overview of induction heating coils
Induction heating coils are important components of induction heating systems that generate electromagnetic waves to heat up and expand magnetic metals.
Coils are commonly wrapped or placed around a seized or corroded item without direct contact. While different applications are performed, the goal is to free ferrous metal components that are otherwise non-removable. Induction heating can also be used to remove parts adhered to equipment such as glass, graphics and decals, emblems, and bed liners, by heating the metal beneath the non-conductive item and breaking the adhesion bond.
The induction heating process is a precise, safe, and reliable method of removing seized elements, keeping you free from the potential danger and inefficiencies caused by the traditional torch.
Because coils are a fundamental piece of the induction heating process, proper care for them is very important. Below, you will find a review of essential heating coil accessories by style and size, along with some tips for how to properly use and maintain them for the best results.
Coil styles and sizes
Pre-Formed Coils
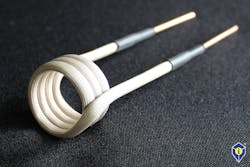
Most coils are pre-formed, which means they have been molded into a specific size and shape and will continue to hold that shape throughout the life of the coil. However, these coils can be separated to fit over an inline application and the leads can be bent to fit into hard-to-reach areas without compromising the integrity of the coil.
Flexible Coils
Flexible coils can be shaped or formed into any size you need. Simply take a socket the size of the bolt you want to remove and wrap the flexible coil around the socket to create the perfect-size coil. Wrap the coil 3-4 times around the application for optimal performance.
3 steps for proper induction heating coil usage
1. Find the right-size coil to fit your application
The induction heating coil should fit around the application with enough space to leave a small gap between the two. Coil fit is vital because how it fits will affect how the unit works to heat the component you are trying to remove.
If your coil size is too large for the application, it may take longer to heat. If the coil is too small, it could burn the insulation and wear out your coil quickly.
2. Secure the coil in place
It’s important to make sure that your induction heating coil is secured into your unit. Otherwise, issues can arise and potentially short out a unit if the coil is not secured.
3. Apply heat for 5-20 seconds to see if you have loosened the application
If the application remains seized, repeat the process until you can loosen it. These short duty cycles will prolong the life of the unit and the coils. In most cases, there is no need to heat the application to “red-hot” to be effective.
How to recognize signs of normal wear and tear vs. damage
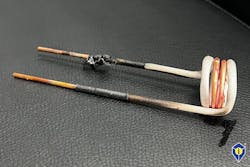
After the first use of your induction heating coils, you may notice that the insulation of the coil will start to brown or darken. This is completely normal, and continues over the life of the coil. With proper usage, a coil should last between 200-300 uses.
Coils with frayed, or missing insulation will be visible. Damaged induction heating coils can be extremely dangerous and run the risk of arcing and burning the unit out. Arcing can also cause the unit to spark, which is a fire hazard.
Replacement coils
If your coils receive damage, we recommend replacing them immediately. Purchase them individually or in one of many coil kits out there. Check with your local tool distributor for induction heating coils.
Information provided by Induction Innovations


