Content brought to you by Motor Age. To subscribe, click here.
What you will learn:
• DIN wiring diagrams have tremendous benefits, aiding in diagnostic efficiency
• Use caution using redrawn wiring diagrams as the can contain mistakes
• European vehicles utilize and identification system different than that of domestic and Asian manufacturers
Did you ever notice if you speak to a technician from a Euro shop, he or she seems to speak a different language? For example, it’s not a 2018 BMW 320i with a 2.0L; it’s an “F30 with an N20 that has an issue in the CAS with the I-level.” If you're not sure what this means, you are not alone. But let's see if I can help you learn enough of the acronyms to get by.
The saying “a car is a car, it’s just a different emblem on the hood” is true, but there is a different language that is associated with some makes. In this article we will talk about some of them and compare them to popular domestic and Asian makes. I have a primarily domestic and Asian service background from when I was in the bays, with the occasional euro car making an appearance, so I can relate to the issues. There was always extra time required to understand the different terminology, figure out the diagrams or locate components. When I went mobile, I had to learn to be able to understand and diagnose these vehicles more efficiently, or I would be in trouble. Although I can get through these systems and issues, I always get humbled when I talk to a Euro shop tech and realize how much more I must learn.
Let the troubles begin
Most often, the complaints I hear from the shop regard an inability to find information or diagrams for the system in question. Sometimes it's that technicians can't find the location of a component (such as a specific relay or fuse in one of the multiple fuse blocks or holders hidden all over the vehicle). Most of this article relates to BMW/Mini & VW/Audi, but much of the info and terminology will carry over to other makes.
European vehicles are often identified by chassis numbers, such as a BMW F15 (2014-18 X5) or an Audi 4L9 (Q7 SUV 2007-up). Knowing these codes will make finding info from some sources much easier. My recommendation is to do a quick Google search for these lists and either print, bookmark them or, save them to an online drive so you always have access to them (as I do).
The elephant in the room
The number one complaint I hear is, “I don’t understand the wiring diagram,” or, “I can’t find any wiring diagrams,” The truth is the technician simply can’t find an aftermarket redrawn wiring diagram for the system in question and he or she doesn’t know how to read a Deutsches Institut für Normung (DIN) track diagram. I've heard techs complain about DIN diagrams since I started working on cars, and all these years later, I hear the same complaints. Like everything else in this business, it requires us to put in some effort and learn so we can understand and effectively use these diagrams. I admit they are a little confusing at first, but once you start getting used to them you will see the simplicity and logic behind them.
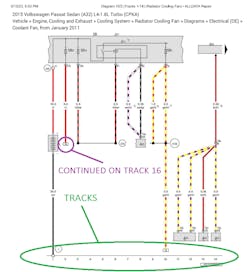
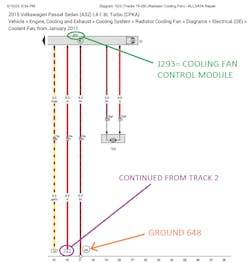
The first thing we need to understand when reading a DIN diagram is source power always starts at the top of the diagram and ground is always at the bottom (simple, right?). The part that gets confusing is the tracks (Figure 1). The numbers on the bottom of the page are the tracks. Notice in track 2 the (red) rt wire leaving fuse 27 goes to a number 16 with a box around it; now go to track 16 (Figure 2) and you see the rt wire again, bringing current to the fan control module.
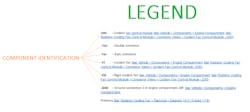
Personally, I use Alldata, and it has legends below the diagrams that identify each component, connector, fuse or ground is, along with hyperlinks for locations and additional info (Figure 3). In figure 2, track 17, this is a ground with the circled number 640 next to it. When we look in the legend, it’s identified as ground connection 2 in the engine compartment. At the top of figure 2 there is a component labeled J293. Referencing the legend, J293 is labeled as the coolant fan control module and a hyperlink takes you to the connector view of the component.
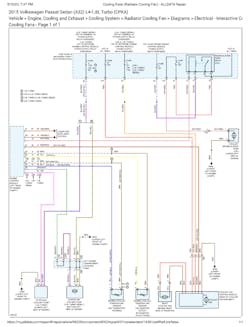
I don’t know about you, but for me, this is a huge time-saver and makes my testing a lot easier. Until recently, my go-to diagram has always been the redrawn ones. But with some manufacturers, I prefer to view the factory diagrams, as they tend to be more accurately drawn and have hyperlinks available. The benefit of the redrawn diagram is it includes other components (in this case, temperature sensors) related to the system (Figure 4). In this case everything is on one page, but it also shows components that aren’t used in this particular vehicle. The components may -differ if the vehicle was equipped with a different engine package. I'm not here to tell you which one you should use; I'm just trying to demonstrate that the DIN diagrams aren’t as difficult to read as most believe they are.
When diagnosing circuits on these vehicles, it is important to understand terminal designations used by the component and vehicle manufacturers. The practice of terminal designation was put into place to allow proper connection identification of the wires going to the components when diagnosing and repairing the vehicles. These terms come up often when following flow charts and test procedures and are also usually included in the legend. Some of the common terminal designations are Terminal 15 (switched ignition voltage supply), Terminal 30 (battery positive voltage supply) and Terminal 31 (vehicle ground supply). There are more, and they will definitely help you understand the operation of the circuits so you can make a faster and more accurate diagnosis, so I recommend looking them up and adding them to your files.
Coding and programming
The next topic I want to cover is the difference between encoding (coding) and programming. When it comes to these vehicles, “coding” is a word that is often mentioned. Many components that are replaced will need to be coded to work properly in the systems.
For example, headlight assemblies will need the modules coded to the vehicle before they will function. Some components will require programming and coding when replaced, while others may just require programming. What's the difference, you ask? Coding is basically setting up the module, providing the software needed to operate. You just need to configure the module so it knows the region it is operating in and the options that are equipped on the vehicle.
A module has just a base level of software (basic operating instructions) when first installed. Programming allows it to receive the operating software for the specific vehicle it is installed in (vehicle configuration). This procedure is more involved and may require additional procedures or modules to be updated. In the case of BMWs, the manufacturer calls for all modules to be brought up to the same level. BMW calls this the “Integration level” (or I-level). For instance, if you replaced a steering rack in the vehicle, you will be unable to program just that module with the factory tool. The factory tool will go in and check the level in each module and determine which ones are behind. You will then have to update all of them.
That may not seem like a big deal to some. But with the number of modules in these vehicles and depending on the speed of your internet, you could be looking anywhere from 30 minutes to 24 hours (and that’s if everything goes through without an issue).
There are some aftermarket tools that will allow you to go in and program just one module, but with that comes risk. If that module is now programmed at a higher level than the other modules in the vehicle, this can create problems with communication between the modules and systems can become inoperative, setting codes and fault messages. Now you are in a situation that can only be repaired with the factory scan tool.
My advice here is to tread lightly and know your pain tolerance before getting involved. While we are talking about BMW module programming, do your research before purchasing a used component to make sure you or someone you know has the ability to make that component work in that vehicle. This may require circuit board-level work and special tooling, as a lot of these modules are intended to be used one time on one vehicle.
Completing the process
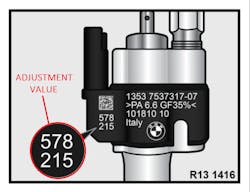
Often when replacing components on these vehicles, they require additional steps before they will function properly. Again, this comes down to following service information. BMW calls these extra steps and procedures “adaptations”. An adaptation can be as simple as clearing values and relearning the crankshaft position after replacing the sensor. It also could be inputting the adjustment value of the new fuel injectors you just installed (Figure 5). In the VW/Audi world, this is called “basic settings.” When replacing some components on these vehicles, you are required to clear out the existing settings, learned values, or calibrations, and then relearn them using the basic settings mode.
This mode is like an active test mode that will operate certain functions and perform procedures required to complete the necessary relearns or calibrations. For example, if you install a replacement ABS control unit (after coding the module), you will need to go into basic settings to perform brake system bleeding, relearn the steering angle sensor, and test the yaw rate sensor.
Basic settings are also used when setting up a new throttle body or transmission after repair or replacement. Aftermarket tools have good coverage when it comes to VW and Audi, but again, components may require coding and programming after replacement. Some components come with theft protection active and require a factory tool to remove the component protection before the module can be put into service. Read service info before attempting these procedures and verify your tools have the ability to complete the process, or you could end with a nonfunctioning component or vehicle.
Ending note
These vehicles require a lot of maintenance and can be highly profitable to service. But like most vehicles, they require specific fluids and procedures to be performed. The use of wrong oils or extended service miles can have detrimental effects on the longevity of the vehicle. Working on these vehicles can be involved and intimidating, but cover the emblem on the hood and go about your diagnostic process like you would any other vehicle.
Read the service info and understand the system you're working on. Formulate a test plan and follow it until your results lead you to the root cause of the problem. The component may go by a different name, but it's most likely the same component you see failing on the domestic models you usually service.
It’s true; Euro vehicles do require you to speak a different language, but it's nothing you can't learn.
About the Author
Chris Farley
Chris Farley is a 25+ year veteran of the industry and the owner and operator of Automedic LLC, a mobile programming and diagnostic business servicing both auto body and repair shops in central New Jersey.
