Tool Briefing - Air suspension issue: a common sense approach
CUSTOMER CONCERN:
Air suspension failure
VEHICLE APPLICATION:
2000 Ford Expedition
STEPS:
1) Safety checks
2) Basic checks (TSBs, switch, doors ajar)
3) Scan tool tests
4) Physical tests
TOOLS USED:
- Scan tool
- Power Probe Hook
- Multimeter
- Laptop computer
- Repair information service
When it comes to vehicle diagnostics and repairs, it's almost an unwritten law that suspension work is “gravy work.” In other words, all muscle with minimal technical thinking involved. However, once you get into electronic suspension, front-end technicians tend to not want to get too involved, especially tire and suspension specialty shops. They often feel it is a little more for an electrical or drivability technician.
With the right tools and knowledge of how to use them, electronic suspension can be your bread and butter as well. Earlier Ford air suspensions had multiple issues and failures. In recent model years, Ford has been putting out a great product. But anyone who says their earlier models were trouble-free would be blowing more air than the suspension's compressor. The tools used for this job were the Autel Maxidas DS708, the Power Probe Hook, a multimeter, a laptop computer and Mitchell1 Pro Demand service information.
First and foremost, when working with air suspension, safety is key. Make sure you are wearing eye protection. It is equally as important that you make sure those around you are aware of the type of suspension system you are fixing. Not only can this keep anyone from getting hurt, there is a side benefit. Once they are alerted of the job, your team may be able to warn you if they catch something out of place that you don’t see. For best safety, always be aware of what you are doing and what the technician next to you is doing as well.
Do the 'smart' checks
Next, try to make it a point to do what I call the “smart” checks. These include the simplest checks that people often overlook; those that could have saved large sums of time instead of chasing your own tail; those checks that, when they are revealed as the problem after an hour of diagnostic time, get you thinking to yourself, “Wow, I am a dummy! How do I justify spending this long on a customer’s car when all it was...” Like I said, the “smart” checks.
On this model, the first “smart” check is the on/off switch. Is the air suspension even turned on? Next of the “smart” checks: Is the door ajar? Many “smart” checks I find, especially if I am not familiar with a model vehicle, are in the service information. They are almost always in bold print at the heading and outlined in yellow, so you can't miss them.
The service information for this one says when a door is ajar, the suspension will go inoperative. Last and always on the “smart” checks are the technical service bulletins (TSB's). Are there any TSBs on the vehicle? In this vehicle’s case, no there are not. Still, this opens up a good opportunity for preventive maintenance opportunities.
If you are already at the computer looking up TSBs, you may notice TSBs regarding customer satisfaction or recent updates in software. Either way, jot them down as notes. It’s always good to be proactive. Mitchell 1 recently released Pro Demand. It is a more convenient electronic service information site than was the company’s On Demand 5, and it really has the technician in mind in regards to browsing ease and makes getting your service information and TSBs more time effective.
Scan the modules
The next step in a diagnosis like this one would be your scan tool. In the case of the Ford Expedition, I like using the Autel MaxiDAS DS708, although any scan tool with factory level software should suffice.
The MaxiDAS does a good job of identifying the vehicle by deciphering the VIN pulled from the Mode $09 data. It not only saves time by not having to punch in all the vehicle data, but it also saves you from the chance of data entry errors. I like to start out with an auto scan of all modules. Not only will this show you which modules you are able to communicate with and are on the bus, but it will also show you codes from all modules and help identify if there are any system malfunctions or communication codes that may affect the suspension from activating.
Once again, you want to keep an eye out for “door ajar switch” codes, as this would prevent activation of the system. If all passes well, it’s time to run an “On Demand Self Test.” In this case, the self test returned a code C1830 Air Compressor Relay Circuit Fault.
At this point in a repair, I like to use the “Remote Desk” function of the MaxiDAS, as I am going to need to use the scanner while I am physically involved with the car. The “Remote Desk” lets you access the scanner wirelessly from your computer. In this case, I got my service cart and laid out my Power Probe Hook, my Snap-on EEDM604C Multimeter and my laptop.
In the first step, if you are testing electrical circuits, you should look at the system’s wiring diagram and familiarize yourself with how the circuit operates. Make sure there is power at the light blue and pink wire.
Perform a voltage drop
Next, perform a voltage drop across the relay control circuit. To do this, you need to use your multimeter. The Snap-on EEDM604C is a great tool. Not only is it a full functioning multimeter with auto-ranging, it also has capabilities of high voltage testing for your hybrid electric vehicles as well as plug-in electric vehicles. It comes with high voltage test leads as well for maximum protection, so you can see it is a great all-around multimeter to have.
Touch the positive side of the control circuit (dark blue/yellow wire) with your positive lead, and the negative side (light green/red wire) with your negative lead. Using your “Remote Desk,” choose the “Air Compressor On” test and command it on. You should have a voltage drop near battery voltage.
Test the relay
The third step is testing the removed relay. For this, I like to use the Power Probe Hook and my Snap On EEDM604C Multimeter. First, I connect the multimeter to the switch side of the relay and choose Ohms testing. There should be infinite Ohms at this point. Next, connect the green Power Probe lead to one terminal of the control circuit part of the relay and touch the probe tip to the other terminal for the control side and apply power. You may hear an audible click, and you should see the Ohms resistance drop down to near zero. In my case, I found the relay to be faulty.
Once you are this far into it, though, you want to ask yourself, did the relay just fail on its own? Or did something cause it to fail? Having the relay out, you are already at the main hub for the whole system; it can really help you to go the extra mile to test it.
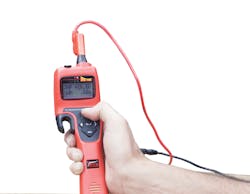
At this point, The Hook is a miracle worker. Here’s how. Apply power to the compressor side of the circuit. The compressor should start working. The thing you want to watch, though, is the screen of The Hook. It calculates the Ohms resistance while applying power to the circuit.
This is great for anything you may suspect of going bad once it heats up from current. If the circuit is faulty, you can watch the resistance rise as the circuit is being powered up by The Hook. Once you have confidence in the fact that the rest of the system is okay, replace the relay and run an “On Demand Self Test” again to verify your repair.
Test drive the car
Now it’s time to go test drive the vehicle and bring those TSBs noted earlier to your customer. This is your opportunity to impress. By presenting the customer a fixed vehicle, but also mentioning other issues they probably noticed but didn’t mention, you establish yourself as an expert. Even more, letting them know that you already know the fix for the other issues not only builds customer satisfaction, but also builds trust.
The techniques used for the Ford air suspension can also carry over to other air suspensions of different model Fords, different manufacturers, and different model years. With these tools and techniques, the repair of electronic suspension will become routine and a regular component of your auto service.


