My wife and her friend, Laurie, like to try trendy new restaurants. Last weekend, they decided on a new Mediterranean dinner theater for "girl's night out." Riding in Laurie's 2003 Jeep Grand Cherokee, my wife heard a strange ticking noise whenever they were stopped at idle. They didn't hear the noise while moving. She also mentioned that the "ticking" seemed to be louder when they drove home after the dinner theater. The next day, we scheduled an appointment for Laurie to find out what was going on with her Jeep.
Customers sitting in the passenger compartment may notice a ticking sound when the engine is idling. The noise may also be described as tapping or clicking. It may appear to be similar to the sound produced by a worn or loose engine valve train component, such as a valve lifter, and may be more noticeable in colder, ambient temperatures. Mechanical contact between the Duty Cycle Purge (DCP) solenoid and the body of the vehicle could be the cause of the sound.
The diagnosis involves isolating the DCP solenoid from the vehicle body.
Diagnosis
- Use the Actuator Mode on the DRB III(R) (or equivalent) scan tool to cycle the DCP solenoid. On the DRB III(R), navigate through the following menus: Main Menu, Stand-Alone Menu, 1998-2003 Diagnostic Menu, Select System Menu - Engine, Select Function Menu, Actuators Menu. Scroll over to page 4 of 5 in the Actuators Menu to find the Evap Purge Solenoid.
- Verify the customer complaint. Sit in the driver seat with all doors closed. The fan on the DRB III(R) can be quieted by temporarily covering the fan exhaust port with your hand. Actuate the DCP solenoid.
- If the ticking sound is present, remove the DCP solenoid from its mounting bracket, but keep the evaporative and electrical connections connected to the DCP solenoid. Allow the DCP solenoid to hang in place, free of contact with the rest of the vehicle.
- Actuate the DCP solenoid with the DRB III or equivalent scan tool. If the ticking sound is now diminished in sound level or is no longer present, then perform the repair procedure.
- If the ticking is still present, further diagnosis is required.
- NOTE: This repair procedure is intended to address DCP solenoid-generated sound that is transmitted through the body of the vehicle (structure borne). The DCP solenoid may also emit sounds that are audible, though not structure borne. A degree of audible sound from the DCP solenoid is part of its normal operation and is not addressed by this repair procedure.
- The repair will require 1 Chrysler P/N 05114514AA DCP Isolation U-Bracket (includes a 3mm x 14mm wide slot rubber bushing) and 1 P/N 53030987 DCP Solenoid Narrow Slot Bushing (slot in bushing is 1.3mm x 14mm).
- Applicable Vehicles: 2002-2004 (WJ) Grand Cherokee
Repair procedure
- With the ignition switch in the "OFF" position, disconnect the evaporative vapor lines and the electrical connection from the DCP solenoid.
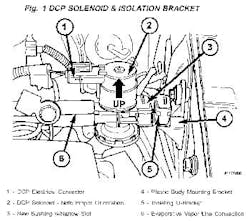
- NOTE: The DCP solenoid has a correct mounting orientation. The body of the DCP solenoid is marked with the words "UP" and "BOTTOM." The electrical section of the solenoid must be on top, while the diaphragm portion of the solenoid must face down.
- Remove the DCP solenoid from its plastic body mounting bracket by grasping the DCP solenoid and lifting upward.
- Note how the rubber bushing is installed to the DCP solenoid before removing the bushing from the solenoid. The original bushing has a wide slot through the middle of the bushing. Remove the original bushing and install the new bushing with the narrow slot, p/n[HG6] 53030987.
- Install the new isolation U-bracket to the plastic body mounting bracket.
- Install the DCP solenoid (with the new narrow slot bushing) to the isolation U-bracket. Make sure that the DCP solenoid is correctly oriented. (See Fig. 1)
- Install the evaporative vapor lines and the electrical connector to the DCP solenoid.
Information provided by ALLDATA
Voice Your Opinion!
Voice Your Opinion!


