Welcome back to another edition of “The data doesn’t lie,” a regular feature in which I pose a puzzling case study.
This one comes from my brilliant friend from sunny California, Preston Maston (of Anderson Automotive, in Anderson, Calif.) A co-worker of his was faced with a 2015 Ford F-150 5.0L. The vehicle suffered from a single cylinder misfire that occurred under all operating conditions. Upon reception the vehicle exhibited an audible indication in the cranking cadence synonymous with a cylinder with significantly low compression.
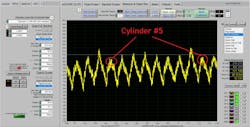
A relative compression test was conducted using the shops eScopeELITE and an amp clamp from Automotive Test Solutions. With knowledge of the engine’s firing order and a consistent misfire, it was clear the offending cylinder was #5 (Figure 1).
Logical pinpointed testing
The benefits of the relative compression test results are two-fold:
- The relative compression test confirms a mechanical fault
- The test takes less than a minute to perform
With this efficient information in hand, the technician quickly justified investing the time to remove the offending cylinder’s spark plug for compression testing. The results of the test yielded a meager 70 psi of compression. Far less than that from one of the healthy cylinders (110 psi).
Of course, the technician then followed up with a cylinder-leakage test to determine where the leak source was in the offending cylinder. To this point, I agree with every test the technician has performed however, the results of the cylinder-leakage test left the technician scratching his head.
Considering the significantly low compression attained during testing, he certainly anticipated a large leak to be discovered. To his dismay, the cylinder-leakage test proved less than 5% loss (considered normal for many engines). At this point the technician knew he had crossed into uncharted territory. Wisely, he reached to the shop foremen (my good friend, Preston) for some insight.
Just the facts, please
After a quick consultation with the technician, Preston weighed the facts. Although low compression is typically caused by a leak, Preston is aware of the traditional compression test’s limitations (with a gauge/Schrader valve). The test only shows the cylinder’s ability to harness and squeeze its contents. However, if the cylinder can’t fill, there is nothing to squeeze.
Armed with this knowledge, Preston offered that the cylinder can’t breathe and that the fault is either the intake valves’ inability to open (cam lobes, rockers, or lifter issues) or a severe restriction in the intake, specific to the suspect-cylinder only. Considering an in-cylinder pressure transducer test only takes five minutes to set-up and conduct, it certainly is a logical step prior to condemning an engine.
Preston conducted the compression test using the shop’s 300 psi-rated pressure transducer, also from Automotive Test solutions. This information not only shows exactly what the traditional pressure gauge will show, but without a Schrader valve in place, this test will demonstrate the cylinder’s ability also inhale and exhale.
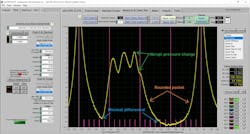
After viewing the data, Preston concluded that the cause of the misfire is clearly visible in the waveform (Figure 2). The compression peaks’ amplitude, the shape of the intake pocket, the rapid change in pressure, and the fact that the exhaust pocket and intake pocket reach the same negative pressure amplitude offers all Preston needed to know to make a diagnosis and justify disassembly.
The data doesn’t lie
With all the information in front of us, and the desired information not yet obtained, we are faced with deciding how to proceed. Here are some bullet points of what we know to be factual, and I will ask all of you, diligent readers, for your input on what they mean to you, collectively:
- The low amplitude compression peaks (towers)
- Sudden change in pressure at the beginning of the induction stroke
- Rounded intake pocket
- Exhaust pocket and intake pocket achieve similar negative amplitude (vacuum)
Given this information, what would you do next?
- Remove the intake manifold to pinpoint the restriction
- Replace the camshaft due to worn intake lobes
- Replace the intake lifters (collapsed intake lifters)
- Replace camshaft due to a disassociated cam lobe
About the Author
Brandon Steckler
Technical Editor | Motor Age
Brandon began his career in Northampton County Community College in Bethlehem, Pennsylvania, where he was a student of GM’s Automotive Service Educational program. In 2001, he graduated top of his class and earned the GM Leadership award for his efforts. He later began working as a technician at a Saturn dealership in Reading, Pennsylvania, where he quickly attained Master Technician status. He later transitioned to working with Hondas, where he aggressively worked to attain another Master Technician status.
Always having a passion for a full understanding of system/component functionality, he rapidly earned a reputation for deciphering strange failures at an efficient pace and became known as an information specialist among the staff and peers at the dealership. In search of new challenges, he transitioned away from the dealership and to the independent world, where he specialized in diagnostics and driveability.
Today, he is an instructor with both Carquest Technical Institute and Worldpac Training Institute. Along with beta testing for Automotive Test Solutions, he develops curriculum/submits case studies for educational purposes. Through Steckler Automotive Technical Services, LLC., Brandon also provides telephone and live technical support, as well as private training, for technicians all across the world.
Brandon holds ASE certifications A1-A9 as well as C1 (Service Consultant). He is certified as an Advanced Level Specialist in L1 (Advanced Engine Performance), L2 (Advanced Diesel Engine Performance), L3 (Hybrid/EV Specialist), L4 (ADAS) and xEV-Level 2 (Technician electrical safety).
He contributes weekly to Facebook automotive chat groups, has authored several books and classes, and truly enjoys traveling across the globe to help other technicians attain a level of understanding that will serve them well throughout their careers.


