Diagnosing an engine misfire
An engine misfire is one of the few driveability concerns we can identify immediately during the road test. Recognizing that a misfire exists is the easy part; the challenge is determining its cause.
When diagnosing a misfire, it makes sense to test the easiest, less invasive causes first, and the first step of all diagnostics is the visual inspection.
Once you've determined which cylinder is misfiring, look around under the hood for an observable cause. Check connections at the ignition coil and the fuel injector. Look for a harness that might have been chewed through by a critter. Remove the coil and check for a damaged or liquid-soaked boot. Remove the spark plug. If the plug is blown apart or covered with carbon, you've found the problem and saved yourself a lot of diagnostic time. If you're not that lucky, check for spark.
Testing for spark
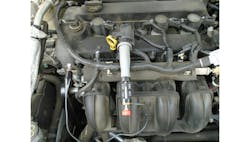
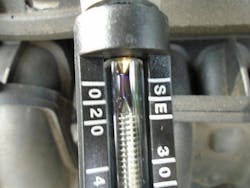
I use a Lisle Coil-On-Plug Spark Tester, No. 20700. It's simple to use and presents a good visual of the spark. The tester has easy-to-read gap measurements of 0 to 40KV, and the spark gap is adjustable. Figure 1 shows the tester attached to coil #2 and the ground wire attached to a good engine ground.
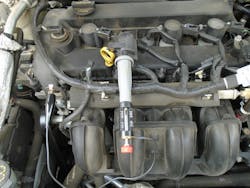
You can easily see the spark jumping across the air gap in Figure 2. Having a good spark at the coil does not mean the spark is making it to the tip of the spark plug. Inspect for carbon tracks along the inside of the coil boot that might have transferred to the spark plug. The spark will follow a carbon track along the side of the spark plug straight to ground, never reaching the central electrode.
Check for power and ground at the coil if you have no spark. For two wire coils, one wire is hot with the ignition on or with the engine cranking, and the other blinks a ground generated by the powertrain control module (PCM). I use a Blue Point Noid Light, No. FID8837, to check the coil harness. Figure 3 shows the noid light connected to a two-wire coil harness connector. You should get a bright blinking light with the noid light connected to the coil harness and the engine cranking. Three wire coils have a third wire that is a full-time ground. This ground is attached to the engine block and should be load-tested. I use two 1157 brake light bulbs to load test ground circuits. If we have a good spark, we check for fuel.

Listen to the fuel injector
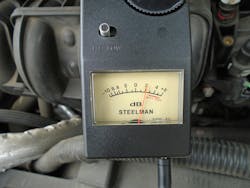
Listening is the best way to determine if a fuel injector is working. I use a Steelman EngineEar II Electronic Stethoscope to listen to the fuel injector while the engine is running. The tool features a decibel meter with seven sound level control settings ranging from 60 to 120 decibels. A pair of over-the-ear headphones are included to help block out background noises when scanning.

In Figure 4, the tool is positioned to listen to the fuel injector. As you can see in Figure 5, the meter shows 2 decibels at the injector. Compare the sound of the injector to a known good. Mechanically defective fuel injectors tend to rattle rather than click. If the injector is silent, it's not working, so use the noid light to verify power and ground at the injector.
It could be an engine concern
Most misfires caused by a base engine concern will create a low compression condition in the failing cylinder. It's essential to use a good compression gauge that you can count on to display and hold compression readings accurately. A leaky gauge can ruin your day. Our diagnosis is only as good as the equipment we use. I use the Mityvac MV5532 Digital Compression Tester. The gauge offers a digital readout with a maximum compression indicator. Compression values can be stored for up to 12 cylinders, and the tool comes with all the hoses and adapters you should need. Figure 6 shows the compression tester hooked up to cylinder #2.
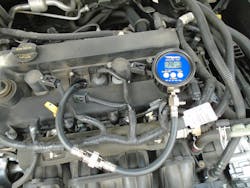
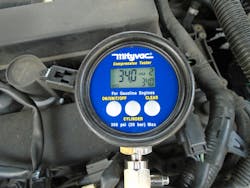
Figure 7 reveals that Cylinder #2 only has 34 psi compression and the maximum compression indicator on the lower right of the readout shows that this is the highest compression recorded in this cylinder. A leaking valve or leaking compression rings are the most likely cause of compression loss in a cylinder.
A cylinder leakdown tester will determine the percentage of air escaping the cylinder, and your ears will determine where it's going. I use an OTC Cylinder Leakage Tester, No. 5609. Figure 8 shows the leakdown tester hooked up to cylinder #2. The left gauge shows that 100 psi air pressure is being pumped into the cylinder, yet the cylinder is only holding 15 psi per the right side gauge. This indicates 85 percent leakage in that cylinder. The air can easily be heard escaping from the exhaust.

Skip the wet test
I'm sure some of you use the wet test to determine whether a valve or a piston ring is causing the compression loss. This test is performed by taking a mechanical compression test after squirting oil into the cylinder. The premise is that oil will seal a leaking ring and won't seal a burnt valve. I've never liked this test, and I don't use it. More than once, I've seen oil seal a leaky valve, resulting in an incorrect diagnosis. Cylinder leakdown is the only sure way to diagnose a compression loss.
An intake valve not opening will also cause low compression, simply because there is nothing being pulled into the cylinder to compress. Also, be sure that the cylinder walls aren't washed down with fuel due to a faulty injector before condemning the base engine. Gasoline-soaked compression rings will stop sealing, causing low compression.
Don't forget the cooling system
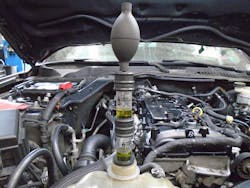
Coolant entering the cylinder is a base engine concern that will cause a misfire without always affecting compression. This is especially true for misfires during initial startup after a short soak. Coolant will seep into the cylinder when the engine is off, usually through a failed head gasket or a cracked head. A cooling system combustion leak tester uses liquid bromothymol to detect CO2 in the cooling system. The testing fluid starts out dark blue and changes color when it absorbs CO2. In a case of extreme contamination, the liquid will turn yellow when testing a gasoline engine. The liquid will turn green or even a lighter shade of blue when only small amounts of CO2 are detected. I use the Blue Point Combustion Leak Tester, No. GDCT16. Figure 9 shows the results when the tester detects CO2 gases in the cooling system.
Be sure that the cooling system is at operating temperature when testing. Dual-chamber testers are more accurate than single-chamber testers because the first chamber serves as a filter to absorb any alkaline particles that could induce a false reading. If the second chamber changes color, it sees combustion gases.
Trust your equipment
Like most things we do, a misfire diagnosis is only as good as the equipment we use. The confidence of knowing that the input you receive from your diagnostic tools is accurate is more than worth the extra time and money.
Tools used
- Lisle Coil-On-Plug Spark Tester, No. 20700
- Blue Point Noid Light, No. FID 8837
- 1157 Brake Light Bulbs
- Steelman EngineEar II Electronic Stethoscope
- Mityvac MV5532 Digital Compression Tester
- OTC Cylinder Leakage Tester, No. 5609
- Blue Point Combustion Leak Tester, No. GDCT16
About the Author

Roy Dennis Ripple
Roy Dennis Ripple is a Ford Senior Master Technician and an ASE Master Technician with more than 30 years' experience in the automotive industry. As an automotive journalist, he is the recipient of a 2020 Azbees Award and a 2020 Tabbies Award. Ripple is currently working full-time as the shop foreman at a Ford dealership. He lives in New Jersey with his wife, three dogs, and two motorcycles. He can be reached at [email protected].