Editor's Note: This article was orginally published May 4, 2012. Some of the information may no longer be relevant, so please use it at your discretion.
The growing complexity of technology in today's vehicles continues to drive the need for solutions to diagnostic and repair challenges you face every day. In this issue, we'll address questions PTEN readers have submitted about inspection tools, including some of the tools used to perform diagnosis in certain systems. So, if you've got something on your mind pertaining to tool and equipment use in a given application, please send it to [email protected].
Q: We're considering a borescope for our shop, but we're not sure what to look for. Any tips?
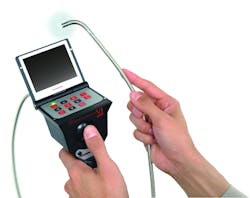
A: In recent years, borescopes have emerged as one of the best investments you can make in an inspection tool. As features for these tools have increased, prices have come down, making them an excellent value. Although rigid borescopes with a fixed eyepiece still have purpose, your best value in borescopes is the video borescope. Harnessing the latest technology, video borescopes empower you to use this tool in more applications than ever before.
Today's models feature lit, flexible probes in various lengths, with the ability to not only view things you inspect, but also to record what you see. For instance, you can capture digital images for archiving with customer work orders, or even capture video that can be used to help sell a given job.
Q: When comparison shopping video borescopes, one model has a larger screen with lower resolution than another model with a smaller screen and higher resolution. I'm confused as to which would be the better choice.
A: As is the case with computer displays, the higher the resolution, the clearer the image detail—at least in theory. Higher resolution displays yield more electronic “dots,” known as pixels, which should reveal more details in the image you see. However, there are some variables in play here.
For one, a display can't reveal details any better than what's taken through the probe end, the “camera” of a video borescope. Second, depending on the quality of the imaging technology within the borescope, and the lighting adjacent to the probe's end, the quality of the image conveyed to the display may not take advantage of a higher resolution display. Some borescopes may display images that are more “grainy” in low-light conditions than others.
So, although specifications are something to brag about and admire as a “techie,” your best bet is to test drive the borescope you're considering to see if it produces the details you'd like. Use this approach for more than just the visual display on the screen. Also compare captured images and video between models, so you're making a thorough comparison. Remember, you're going to count on this device day-in and day-out to make good judgments on repair scenarios. Don't cheat yourself by making a shallow judgment on tool performance.
Q: What can we do to make sure the borescope we choose is not right just for today, but also out into the future?
A: We all know we can't be shielded from improvements in technology and the new features it continually brings, but there are a few things you can do to make sure the borescope you choose can have a long, healthy and productive life in your shop environment.
Start by making sure your purchase is protected by a strong warranty and support network, in the event you have any problems with your borescope purchase. Also consider optional accessories such as extended probes and related incidentals including magnets, mirrors and hooks. Some of these options may not make sense now, but knowing they're available can reinforce the viability of your purchase going forward. Lastly, don't forget to ask your rep about any available training for the tool, to help you get up to speed quickly.
Q: Our shop encounters a wide range of electrical relay failures on a growing number of makes and models. Is there a tool that can quickly help us inspect or diagnose these relays?
A: Yes, a deluxe relay test set fits the bill perfectly for these applications. The set comes with a set of relay pliers to make removing and installing relays easier, along with a host of adapters and jumper leads to facilitate connection of a multimeter or other test equipment. Through use of this test set, it eliminates the need to pierce wiring insulation for testing, which could otherwise lead to further electrical problems down the road. Of course, always follow recommended diagnostic procedures when using this set for diagnosing relays.
Q: We want to work on some European models that use Bosch KE-Jetronic fuel injection systems. What do we need to perform fuel-pressure connections on these vehicles?
A: European imports with Bosch K-Jetronic or KE-Jetronic fuel injection differ slightly from most conventional electronic injection systems when it comes to connections and testing. Since these systems operate at higher pressures than most electronic systems, make sure your gauge reads a maximum of at least 630 kPa (90 psi).
You also need a special adapter hose with shut-off valve and some other small adapters to connect to various makes of cars. Tee into the control pressure line with adapter. The control pressure line connects the fuel distributor and the control pressure regulator. Follow a reliable shop manual to the letter when taking your pressure readings.
Q: We mostly work on domestic cars that come equipped with a fuel pressure test port for connecting a fuel pressure test gauge. As our services have expanded into Asian makes, there is no test port. What's up?
A: Asian makes typically don't have a fuel pressure test port, but the truth is even larger than that. Asian engines used in so-called domestic chassis may also be lacking a test port. Connecting to most Nissan, Mazda and Mitsubishi models requires the same type of series connection.
First, locate the fuel filter in the engine compartment. Then, disconnect the outlet line and connect a tee fitting between the outlet line and the fuel filter. Connect your gauge and take your readings. Toyota and Lexus engines commonly use a cold start injector. With that in mind, Toyota engineers designate this spot as the access point for fuel pressure testing.
You'll need a special fitting to connect to these engines. In some cases, you may need to connect at the outlet of the fuel filter. If you're using an aftermarket gauge and adapter hook-up, the connection is similar. Nevertheless, it's best that you refer to the user's manual and follow the gauge maker's recommendations.
To tap into a Honda or Acura injection system, you'll need a special 6mm adapter. To install it, remove the 6mm bolt from the top of the fitting on the outlet line at the fuel filter. The filter mounts to the firewall at the right side of the engine compartment. Then, thread the adapter into place and tighten. Connect your gauge and follow the manufacturer's procedures and specifications for checking fuel pressure.
Q: Some of the work we do calls for the use of a dial indicator. How does this differ from a micrometer and are there other needs for a dial indicator other than engine work?
A: Typically you use a micrometer to take precision measurements of components, such as pistons, brake rotors and others and then compare the measurements to specifications. A dial indicator, on the other hand, becomes the tool of choice when looking for measured variations to see if the variations are within specifications. When using a dial indicator, the part being measured must move so the indicator's plunger can “feel” any variations in the part.
For example, you'd use a dial indicator setup on a camshaft to measure the height (lift) of camshaft lobes. As another example, a dial indicator is the solution for checking disc brake rotors for run-out (wobble). With the dial indicator in place, you rotate the rotor while observing the indicator's dial for variations, representing run-out. You then compare your readings to published specifications in a reliable shop manual.
Q: We see a fair number of cars with failed vacuum motors. Is there a tool that can help us check out vacuum motors quickly?
A: Yes, one of the handiest tools for diagnosing vacuum motors and other vaccum-related components, is the handheld vacuum pump. Vacuum motors may contain one or two diaphragms to push or pull and are used in heating and air-conditioning system ducts, heater control valves and more. Checking a vacuum motor is easy.
Connect the pump to the fitting on the motor and apply at least 10 in. Hg. of vacuum. The motor's actuator should move. Once the actuator stops moving, watch the gauge on the pump to check for diaphragm leaks. It the diaphragm is OK, the vacuum should hold for one minute. Replace the motor if the actuator fails to move or the diaphragm leaks.
That's it for this issue's Tool Q&A. We'll see you next month when we discuss Tire Pressure Monitoring Systems (TPMS) and tire service.


