What you will learn:
•Systematic approach to fault finding
•Newer tools to evaluate tire condition and TPMS
•Other tools to ease the workload of the technician
Automobiles and trucks have been intertwining various vehicle systems to better account for changes under varied operating conditions. A solid first step in almost every modern repair situation is performing a full system code scan, using a capable scan tool. This allows the technician to quickly view any systems that are reporting faults (real or perceived) and evaluate what effect (if any) these faults have, concerning the customer’s complaint. If there are no faults present (such as ABS, traction/stability, TPMS, or ADAS-related faults), then we can continue with a visual inspection, followed by a road test, and any other needed testing and evaluation.
Gathering this information is very important but without the proper knowledge, it doesn’t give us a lot of direction. That is why continuing education (both classroom and self-guided, with service information) is the single most important tool in conducting any diagnostic and repair work. One needs to know the system and its intricacies before a complaint can be properly evaluated, and the best course of action and tooling decided upon.
It should go without saying that every shop needs access to one or more sources of SI (service information), be it ALLDATA, ProDemand, MotoLogic, or OEM websites. Consulting the service information is the primary way to ensure that any procedures are being performed correctly and in the correct order, so that these complex systems continue to function as designed. Something as simple as raising or lowering vehicle height, through suspension modifications, or just a heavy load can start to have a snowball effect.
Wheel and tire service is something we all perform daily, and often don’t think too much about it. After all, in the past there weren’t a lot of strange issues that popped up and challenged a technician, assuming some basic best practices were followed. Modern automotive design and tighter tolerances have made these basics even more important as well as adding new techniques, to quickly locate the problem.
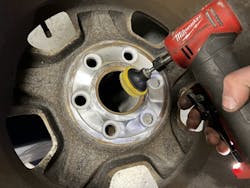
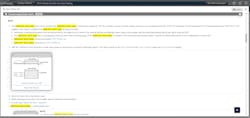
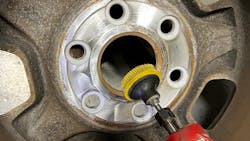
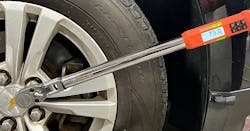
As far as basic best practices go, I’d like to re-introduce (and perhaps introduce for the first time, to some) the concept of R.I.S.T; something I first learned about while working in a truck shop early in my career. R.I.S.T. is an acronym for the proper steps to install a wheel and tire assembly after service:
These simple steps help to avoid issues like loosening of wheels over time, overtightening that can lead to warping or distortion of some wheel assemblies, and stripping of lug bolts or nuts. A clean hub also ensures better fitment on a tire balancer, which leads to a proper balance. I’ve found the quickest means of cleaning the hub and rim assembly without risking damage is my Milwaukee die grinder with 3M Roloc bristle discs, yellow for aluminum, and green for steel wheels. Following this up with proper torqueing of the wheel fasteners; I use the TechAngle series from Snap-on for torqueing as I appreciate having the readout in the top right corner that keeps track of how many times the correct torque has been achieved. It’s a small feature, but one that helps confirm that each wheel fastener has been torqued.
TPMS (tire pressure monitoring systems) became mandatory in the U.S. in September of 2007, whether it be a direct or indirect system. Direct systems, consisting of powered sensors mounted within the wheel, make up many of the vehicles our shop sees on daily basis. In-direct systems utilize a variety of sensor inputs to determine if a tire is underinflated; though they lack a physical sensor and the maintenance that comes along with them, they have their own set of service challenges and considerations.
The first rule of any tire service, even a simple rotation, on a vehicle equipped with TPMS is to document the state that the system came in. This means notation of any TPMS lights, as well as confirming the operation or lack-of, of each installed sensor. This only takes a few minutes and saves time and headaches down the road as well as presents an opportunity to educate the customer on the state of their vehicles.
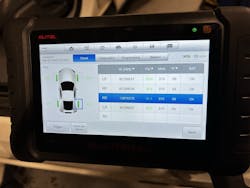
There is a multitude of TPMS tools on the market, from simple activation devices to mid-grade units that read and program sensors, up to full function units that simplify sensor programming and position relearn with OBD2 integration. A TPMS activation (trigger) tool simply wakes up sensors that are in sleep mode while a TPMS reset tool can be used to reprogram and reset TPMS sensors within the TPMS monitoring module. A TPMS “decoding” tool can do all of the above as well as readout additional data such as temperature, battery status, and more depending on the system. The choice of tool depends on the individual shop or technician’s needs. Almost every major tool or scanner company offers a TPMS solution, be ATEQ, Bartec, Autel, Snap-on, Launch Tech, or a variety of other brands. Currently, my main TPMS tool is the Autel TS608, it covers 95 percent of my daily usage needs, has a relatively simple interface, and incorporates live scan data functionality and service reset functions. A shop that does a larger volume or variety of vehicles may be better served with a tool such as the ATEQ VT56.
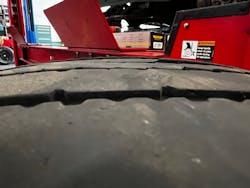
Many TPMS tools are now integrating tire tread depth capabilities into the tool, or as an accessory. These are a great addition to help quickly evaluate the condition of many tires and more clearly illustrate irregular tread wear patterns (which can affect vehicle handling characteristics as well as create faults with indirect TPMS systems). These tools are an excellent aid in evaluating and documenting tire conditions, especially in inspection states (like my home state of Pennsylvania) but are not a replacement for a good visual inspection. For example, unusual tire faults such as broken or shifted cords, as well as tire breakdown may not always be caught by these tools, depending on where the measurement is taken on the tire.
Modified vehicles
As long as there have been vehicles, there have been people modifying them to better suit their own needs, be it work or play. These modifications play a major role in making sure we are servicing the vehicles in our bays properly. We’ve already run through a few of our baseline best practices, now it’s time to put the pieces together.
Since every vehicle is designed to operate within a set of parameters, when a customer starts to change one or more of these parameters then others begin to change. This can lead to a compounding of pre-existing problems or aggravate inherent weak points in the design of a specific system. Our shop works on a few commercial fleets that tend to run their trucks heavily loaded, and with a less than optimal weight distribution. The trucks are equipped with utility bodies, flatbeds, and/or cranes depending on their usage; all these changes, even on a cab and chassis set-up, create different handling, ride, and wear characteristics. We often see heavily cupped front tires, rapid brake pad and rotor wear, as well as vehicles being thrown out of alignment rather quickly, which compounds the pre-existing issues.
The best way to handle these “customized” vehicles (like work trucks, lifted and lowered vehicles) is to evaluate the vehicle from an intended usage standpoint. This includes noting tire size, tread pattern, overall ride height, and loading of the vehicle. After performing my initial first steps of code scan, visual inspection, and a test drive, I perform a comprehensive evaluation of the suspension and steering components, to determine what components need to be replaced, repaired, or adjusted.
There are some tools on the market (such as the Mueller-Kueps 432-910), which are designed to aid in finding worn bushings, bearings, and struts. A tool like this can also be built in the shop, as illustrated by fellow technician ("Chad," of The Practical Mechanic YouTube channel), in his "Make a tool" challenge video. It’s become an invaluable tool in my evaluations.
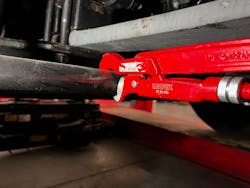
Once the vehicle has been evaluated, the problem located, and repairs or upgrades performed (following best practices), it’s time for the final step in the process, alignment. Alignment systems are often used “out of the box” without ever delving into the deeper capabilities of the system. Our shop utilizes two Hunter alignment machines (one for automotive and one for medium and heavy duty trucks). The automotive software contains a sub-program called WinAlign Tuner, which factors in ride height and other user selectable variables, to dial in the perfect alignment for vehicle configuration and end usage. This helps compensate for uneven ride height that may be unavoidable (due to the loading of the vehicle) and allows for a proper alignment, that keeps the vehicle going straight and tires wearing correctly. As for getting the alignment down efficiently, one of my newest favorite tools is the KNIPEX S-Type Pipe Wrench Pliers. They make holding and adjusting toe bars and tie-rods extremely easy.
Wheel and tire service is far from the most glamorous or exciting aspect of daily shop operations. Most technicians don’t spend a lot of time reading alignment or tire balancing case studies. Despite this, it is one of the most important aspects of service and repair; it’s the customer’s direct link to the road and should be treated as such. Following best practices as dictated by service information ensures that technicians can not only effectively evaluate complaints, but also make recommendations and repairs or adjustments, that will help alleviate or prevent excessive wear and tear on the vehicle.
