Content brought to you by Motor Age. To subscribe, click here.
What You Will Learn:
• Always reference service information as system configuration varies per vehicle
• Interrogate customers to gain a diagnostic edge
• Always determine the root cause of a fault before condemning components
I’ll begin this article with a simple problem that could have been harder to diagnose and repair if I did not use my diagnostic game plan.
Sometimes it’s easy to get off track and take the backhoe out when the shovel will do the job. I have seen many techs go down the wrong path and start with an advanced diagnostic procedure that sends them in circles. Remember that old saying, KISS (keep it simple, stupid)? No, I am not saying anyone is stupid, so please don’t take it the wrong way.
But sometimes after taking a class or reading an article with an advanced procedure that found a problem, we decide to use that approach first. After all, it’s normal to want to take out your new diagnostic equipment and use it to find the problem. But going down that path may send you the wrong way, only to find out later that a basic test would have found the problem.
When you read through this first vehicle case study you may think, “He must be kidding. This problem would have been a piece of cake to diagnose.” But as you read through it and see that the test procedures initially used did not uncover the issue, you will then understand that many times, basic testing procedures are all that are required to uncover the problem.
Misfiring Hyundai
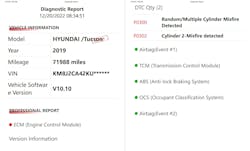
Our first problem was a 2019 Hyundai Tucson 2.0L with 71,988 miles. It came in with a complaint of the check engine light illuminated, running rough, and lack of power. Keeping in mind that a diagnostic game plan (including speaking to the vehicle owner, visual inspection, a full scan of all computer systems, and repair information lookup) is the best step forward. In this case, after speaking to the vehicle owner I took his Tucson for a short test drive, followed by a full system scan to see what caused the MIL to illuminate. I uncovered P0300 and P0302 DTCs (Figure 1). Using my best tools first (my brain, eyes, ears, nose, and hands) to check everything from the data stream, Mode $06, relative compression, fuel, and ignition, I came up empty-handed for anything that could’ve caused the misfire DTCs.
On today's vehicles, it is usually straightforward to confirm a misfire by performing one of the tests I previously mentioned, but not on this engine. The misfires were not detectable during my test drive or testing with my scan tool, scope, or ignition tester. Could it be a COP coil failure that is common on many engines?
I tried the easiest thing first (the coil swap) by switching a coil from a non-misfiring cylinder to cylinder number 2 without any change in the data. I remembered that the vehicle owner told me the engine had a catastrophic failure at 34,433 miles and the engine and other auxiliary parts were changed under a Hyundai recall.
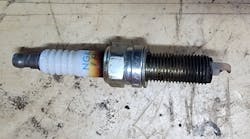
The problem was due to a faulty spark plug that was allowing compression gases to leak out of the cylinder. This is indicated by the brown stains on the plug (Figure 2). It was this loss of cylinder charge that was causing misfires, but they were not detectable in the misfire data, mode $06, or primary/secondary ignition analysis.
In my opinion, by changing the spark plugs I confirmed that they were the cause of the misfires. The manufacturer of NGK plugs states corona stains is normal and caused by oil or dirt particles along with static electricity. My conclusion was that two of the four spark plugs that I removed (with brown stains) were leaking compression and causing intermittent misfires and the associated DTCs.
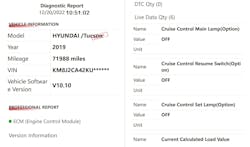
After removing all the plugs and installing a new set of (OEM-recommended) NGK spark plugs, I performed a computer rescan of the vehicle that resulted in no DTCs (Figure 3). The Hyundai was fixed and running great again, and the root-cause problem was solved.
The stalling, dying Chevy
The next vehicle up is a 2004 Chevy Monte Carlo with a 3.8L supercharged engine, and 20,536 miles indicated. This vehicle was the owner’s pride and joy that he only took out on nice days. He complained that the engine died while driving and then wouldn’t restart right away. The owner showed us receipts from two different GM dealers that diagnosed and changed the complete exhaust system (including the catalytic converters), spark plugs, MAF sensor, fuel injectors, PCM, and more.
After compiling the information from the owner, we started our diagnosis and found that the fuel system was not up to specifications. The fuel pump current-ramping waveform was all over the place and at about 4 amps when it should have been 6 amps (Figure 4).
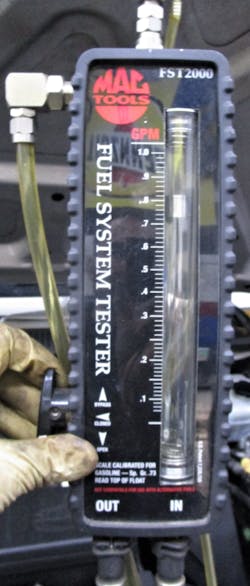
We followed the current-ramping test by checking pressure and flow. The pressure was within specification, but the flow was about .3 of a gallon per minute when it should have been at a minimum of .5 gallon per minute. Using the MAC Tools FST2000 fuel system tester, here is an example of good fuel volume (Figure 5). Flow is the key to proper fuel delivery to the engine, especially on a supercharged performance engine.
We replaced the fuel pump with an OEM pump and retested the system. It now passes the current ramping, pressure, and most importantly volume tests. After running the engine for hours and getting it hot, we drove the vehicle and noticed that the engine delivered more power and had no DTCs or problems.We called the owner and told him the vehicle was repaired and ready for pickup. The owner stated he did not want the vehicle back until we were 100% sure that the engine would not stall again. In a way, we were lucky that he lost confidence in the vehicle’s reliability, providing us more time to confirm that the Monte was fixed.
We were confident that we solved the problem and thought that the customer was a bit strange for insisting we keep the vehicle. But then again, after two GM dealers supposedly repaired the vehicle, it still resulted in him getting stuck; we understood his paranoia.
We called the owner to inform him we had driven over 600 miles without encountering any issues. I voiced my concern about driving his collectible vehicle and putting more mileage on it (along with the increased risk of something getting damaged). He didn’t care about any of that and wanted it driven at least 2000 miles before he would pick it up.
Thinking this new customer was out of his mind, I tried my best to convince him otherwise, but he stated once again he lost faith in the vehicle. Although I felt a bit uncomfortable driving his vehicle for so many miles, I gave in and told him we would continue to drive it to reinstate his confidence back in the Monte Carlo.
The day finally came when we completed over 2000 miles road test (without stalling). We called the customer requesting he come in to confirm the distance we had traveled before paying the invoice. The test drive went well, and he was very happy. He paid the bill and took off. Months went by without a call from the vehicle owner. Bill and I were confident that the vehicle was fixed and thought that we would not hear any complaints from him again.
Later that year, the owner contacted us to inform us it happened again. He was stuck about a mile away from his house. I assured him we would come right out to diagnose the cause of the stall/no-start.
We brought a scan tool, lab scope, fuel gauges, vacuum gauges, and a propane-enrichment tool to diagnose the engine issue. When we arrived at the location, the engine was nearly at operating temperature and did not start. This seemed like a different issue than during our previous encounter (since the engine was not as hot as it was during the original complaint).
After checking for codes, none were found. We looked at data PIDs, spark, and fuel. All appeared to be normal. There are only four things that run an engine, as we all know: air, compression, spark, and fuel. Since this engine had all of them present, our next step was to disconnect the engine sensors (one at a time) to see if maybe a 5-volt reference was being pulled down.
Starting with the easiest sensor first (the MAF sensor), followed by other sensors (except for the crankshaft position sensor and camshaft position sensor, since the engine needs them to provide spark and fuel) we were down to unplugging the hardest sensor to access, the MAP sensor. It was buried way in the back of the engine.
Once I disconnected the sensor, Bill cranked the engine over and it started right up. As soon as I plugged the wires back into the sensor the engine died and would not start. Since we had to drive the vehicle back to the shop, I had to leave the wires to the MAP sensor disconnected.
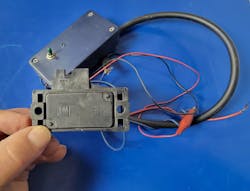
The owner called for a ride and requested that we call him with the diagnosis. When I got the vehicle back to the shop, I parked it outside and tended to other work that we had scheduled. Later in the day, I plugged the wire harness connector back into the MAP sensor) and cranked it over, resulting in the engine starting right up (Figure 6).
I ran the vehicle outside until the engine died and would not restart. I unplugged the MAP sensor and once again, the engine would restart. Since this happened like clockwork, I realized that the MAP sensor had a problem that was temperature-related.
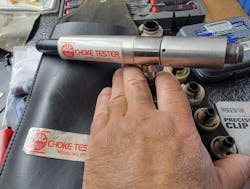
I called the GM dealer and ordered a new MAP sensor, since the customer only wanted dealer parts installed. In the meantime, I conducted a brief experiment. I removed the sensor and placed it in our shop freezer for a bit. Once the sensor cooled, I connected it to the engine and the engine started. I went over to my toolbox and took out my old MAC Tools CT901 carburetor choke tester (Figure 7). It uses shop-air to function and allows for one side of the tool to output cold air while the other side dispenses hot air. Using it allowed me to duplicate the problem. The engine died and would not start until it reached a certain temperature. The problem was the MAP sensor had an internal issue that I could now prove to the owner.
I installed the new sensor and the engine started right up and stayed running, confirming my diagnosis. The vehicle owner was once again able to enjoy driving his Monte Carlo with confidence.
No-charging Toyota
2009 Toyota Camry 2.4 L with 120,561 miles on it came into the shop with a complaint of a slow-cranking engine, dash light illuminated, and dim headlights. We connected our Midtronics tester to perform the battery and alternator output test. The battery failed the test, so we could not properly test the alternator until we could correct the battery issue.
The next step was to connect our Associated smart battery charger to get the battery backup to specification, making sure it was good before retesting the alternator. The battery passed the test, so we moved on to rechecking the charging system, confirming a bad alternator. Since the alternator was not able to output a proper voltage there was no doubt it had to be replaced.
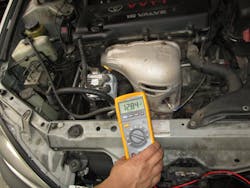
We ordered a replacement alternator, installed it, and rechecked the charging system which once again was not outputting a proper charging voltage (Figure 8). Bill called the parts store to get another alternator and installed the replacement, only to come up with the same results.
At this point, Bill used Identifix and “RTFI” (read the friggin’ information) to find this issue can occur on high-mileage Toyota vehicles. The problem can be caused by the engine not idling properly (our vehicle had no such problem) preventing the alternator from charging as designed.
Identifix had a diagnostic procedure listed to perform a voltage drop on the white sensing terminal wire, followed by checking the voltage level (On our sick Camry, the voltage was only at 11.6 volts). The next step was to run a jumper wire between the battery and the white wire at the alternator, then rechecking to see if the alternator will output proper voltage. This made no difference.
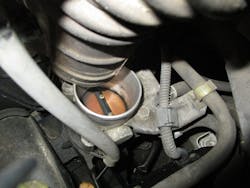
The information went on to state that a dirty throttle body could cause the issue as well. Bill removed the throttle body boot and found a dirty throttle body (Figure 9). He cleaned it and then performed an idle relearn.
The idle system is controlled by the ETCS (electronic throttle control system). It detects the accelerator pedal position as the APP sensor signal is sent to the PCM. The system will then control the throttle valve opening angle and monitor its position via the TPS (Throttle position sensor) signal. This is why after cleaning the throttle body, it is important to perform a throttle relearn. The next step was to recheck the alternator output, making sure the system was working as designed. Out of curiosity (and since it is an easy alternator to remove), Bill removed the new alternator and reinstalled the original alternator. The results confirmed it was defective because there was still no voltage output. However, even though the original alternator was faulty, neither of the replacement alternators would have functioned, anyway. Bill and I had learned a lesson because we did not realize what we didn’t know. Thanks to Identifix we now knew (we should have read the service information first).
I hope this information helps you diagnose vehicles more easily. I would love to hear your comments; please email me at [email protected]

