Content brought to you by Motor Age. To subscribe, click here.
What You Will Learn:
• Capturing data to tell a story of action/reaction events aids in efficient analysis and prevents misdiagnosis
• Following the clues provided by the captured data yield confidence when it committing to extensive disassembly
• Archiving your data in an organized cloud-based filing system makes data easy to locate and access anywhere in the world with internet connection
I have been an automotive technician for about 25 years. It wasn’t until about my 10th year that I realized the power of analyzing captured data. Having the data in front of me allowed me to relax a bit and focus on fault-finding. It gave me an opportunity to step away from the vehicle and use the best tool any tech has at his or her disposal, his or her brain.
Let the tool tell the story
As an educator, I’m frequently asked, “Brandon, how do you diagnose faults?” Of course, my answer will vary greatly depending on a few things:
- The vehicle’s configuration (what I can reach with my hands)
- Available tooling (what information is available for analysis)
- How the vehicle is equipped (system design/operating characteristics)
However, there are several straight answers to this question that I always offer:
“I capture the data in a fashion that tells a story.” This statement applies whether we are referring to a scan tool, a graphing multimeter, or even a lab scope. These multi-trace devices allow more than one piece of data to be simultaneously displayed. This display offers a more dynamic view of a system (and the individual components of that system) in action. In other words, with the appropriate data captured, we have the ability to see:
- Operator intent (depression of the A/C request switch)
- Input response (ECU recognition of the switched-input request)
- Processing (command to A/C compressor clutch coil relay)
- Output response (A/C pressure transducer reaction)
- System performance (vent temperature sensor and refrigerant flow sensor response)
I always “reach for the low-hanging fruit.” What I mean by that is my diagnostic approach is always structured around using easy-to-grab information to decide what test to invest in next. A strong takeaway from this type of testing above is that it is all done right from the driver’s seat with nothing more than a capable scan tool.
A second benefit to this type of testing is that there is no wasted time. This takes some practice, but employing logic and truly understanding what the test results are telling you (and their limitations, or what they are NOT telling you) will guide you like a steppingstone to the next logical test.
A third benefit of this type of testing approach, regardless of the time required, is that you will always be doing tests that bring you closer to the root cause of the fault. For instance, if all the previously captured data (the easy-to-grab data) points to an internal engine mechanical fault, I will have the engine disassembled with confidence. Understand there is a huge difference between disassembling an engine for exploratory surgery (hoping to find the fault, with fingers crossed) and disassembling an engine to expose the fault (https://www.vehicleservicepros.com/service-repair/diagnostics-and-drivability/article/21293621/lose-a-battle-to-win-the-war).
Letting the tools become the tutor
Implementing the technique described above offers an opportunity to gain tremendous insight into the functionality of a system. I’m simply talking about the action/reaction testing that occurs when data is captured and plotted in a graphical format.
When this information is collected simultaneously, the witnessed reaction that occurs is typically what is also being monitored by the ECU. This ECU is responsible for managing the system operation and flagging when performance faults are present. So how does this help us? I’ll prove it to you.
A scenario I like to use frequently is one involving an EGR valve. The EGR valve will reintroduce inert exhaust gases to the intake manifold. The gases will displace some of the air/fuel charges from the cylinders and simply take up space, temporarily reducing the effective size of the combustion chambers. This reduction in the combustion chamber area also reduces the heat generated from combustion, which reduces the potential to form NOx.
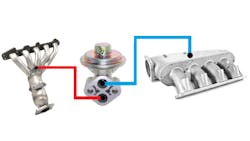
Let’s break that down further. If the EGR valve connects the intake manifold to the exhaust stream, it will act as a vacuum leak when opened. True, it is not a vacuum leak to fresh air, but it is a vacuum leak, nonetheless. Logic dictates that the vacuum (negative pressure) in the intake manifold will equalize to the almost-atmospheric pressure in the exhaust stream when the EGR valve is open (Figure 1).
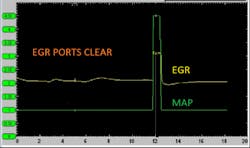
The manifold absolute pressure (MAP) sensor will report the change in manifold pressure to the ECU. If the system is functioning as designed, and if the proper data is viewed, one will see a correlating (almost overlapping) change in both the MAP signal and EGR pintle position (Figure 2).
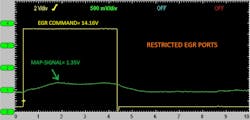
Consider an alternative scenario. With the same data being viewed and when that EGR valve opens, the MAP signal is slow to rise when the change in the EGR pintle position occurs (Figure 3). What do you immediately anticipate the fault being? I’m confident the first thought that comes to mind is a restriction of the EGR ports. Not only is this a logical thought, but it is also a theory developed right from the driver’s seat. This will put you on a path to discovering where the fault is located, and it offers confidence to begin disassembly.
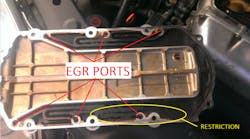
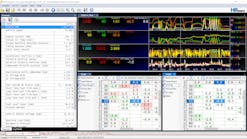
After only a few attempts at capturing data in this fashion, you will find great success as you will quickly learn what to expect from a properly operating system. When a restrictive EGR fault is present, it will stick out (in this same captured data) like a sore thumb (Figure 4). You will experience a drastic increase in not only productivity but also confidence. By allowing the tools to teach you how the system functions, you begin to learn dynamically and through practical experience instead of from a book.
Archiving collected data
As I previously mentioned, capturing and analyzing data away from the vehicle is the secret to my success as a diagnostician. However, what’s to be done with this data once a successful diagnosis is drawn? Believe it or not, many technicians simply throw it away. They find no value in the data when the once-broken vehicle is now functioning after repair. This has always troubled me.
Whether you realize it or not, this data will serve you well for years to come. Keeping in mind that if you capture under faulted conditions, then repeat the capture once the vehicle is fixed, you then have a capture representing a known-good scenario. Be careful not to forget that it is rare to find this information in any book, and it’s invaluable to a diagnostician. What is my point? Don’t simply get rid of it; save it.
There are several recommended ways to save or archive data captures. Years ago, I saved the information to thumb drives and eventually an external hard drive. As technology progressed with time, I transitioned to save my data to cloud-based storage facilities. A few of them available are:
- Dropbox
- Microsoft
- OneDrive
- Google Drive
- iCloud
The benefit of choosing to utilize cloud-based storage is multifaceted. The storage limits vary by service, from 2 GB for Dropbox, 5GB for OneDrive, 15GB for Google Drive, and 5GB for iCloud; additional storage is available for a monthly fee.
I pay about $120 annually for one cloud storage service (Figure 5). For those of you not too savvy, a terabyte took me several years to fill with data captures. Being “cloud-based” is the key. With the information stored in the cloud, the fear of losing data due to a computer crash or hardware mishap is no longer an issue. Simply boot your new device, download the cloud app and log in. You will have instant access to any previously stored data anywhere you have an internet connection.
This same feature also serves you well if you are an educator. Being able to organize and tag content with descriptive words will allow you to recall the capture you desire with simply a few keystrokes. This beats the heck out of scrolling through thousands of captures on several thumb drives. The cloud system functions as an organized filing system, not just a file cabinet. This becomes really handy when building classes and planning lessons or referring your students to examples of functional and faulted captures.
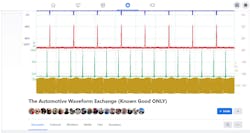
Regarding the sharing of knowledge and networking, being able to hold discussions in forums found on social media (such as Facebook) is enhanced and has more of an impact on learning/sharing when a visual interpretation of what is being discussed can be produced (Figure 6). Furthermore, sharing the file is now an easy task as one can do so with a hyperlink. Simply create a link in the cloud and copy/paste it to the forum or individual person you wish to share it with.
Identifying the captured data
Initially, this was the area I struggled most in. I was very capable of capturing the data that told the story well. I was also extremely comfortable analyzing the captured data to make a diagnostic decision. However, sorting the data in a way that made it easy to locate became a real burden for me. With that, I’d like to offer some advice to help you stay organized with the hundreds (if not, thousands) of captures you will view over the course of a single year.
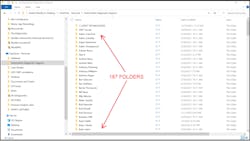
I begin by organizing my cloud account in a series of folders and multiple subfolders. Arranging them in a logical layout aids in efficiency. I build the main folders by the name of the person I’m assisting. The cloud can be configured to arrange them in alphabetical order as well (Figure 7).
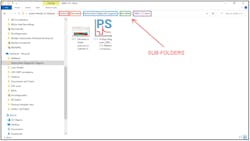
Within each folder can be multiple subfolders. These subfolders represent the subject vehicle for which the inquiry was placed. There will be a subfolder for each individual vehicle (Figure 8). If necessary, the subfolder will include the VIN, the symptom, and any distinctive configuration characteristics required to properly identify the vehicle in service information and wiring diagrams. I like to place this information in the folder because this removes the need to tag each individual data capture with redundant information.
When it comes time to capture the data (using a scope or scan tool), be sure to label the capture with the following pieces of information:
- Current operating conditions (idle/brake-torque/heavy-load, etc.)
- Whether the symptom is exhibited or not
- Brief description of what the data is displaying (“MAF signal dropout under load,” for example)
Specific to scope channels, be sure to identify which circuit on the vehicle is associated with each channel utilized. This may seem like common sense, but you’d be surprised how many captures I’m asked to analyze that do not contain this very important information. It is absolutely crucial to a successful diagnosis. Many of the scope and scan tools offer this ability within the software. If not, do what I do: snip a screen and plot it in Microsoft Paint. It’s free and will allow you to annotate directly on the capture or a photo.
Many don’t give this much thought, but where the circuit is being sampled from is important information to know. What I’m getting at is a scenario where a suspect circuit contains an unwanted resistance/voltage drop and it will only be revealed if the test leads are placed appropriately. Be sure to include this information in the capture, preferably in the area where the channel of the scope is assigned to a specific circuit.
Finally, be sure to label or name the capture appropriately. Remember, it’s this very information that you will likely have to revisit sometimes years after the data was captured. If you take the time to capture, label and identify appropriately, these data captures will serve to tell a story that is recognizable by other trained analysts, regardless of how much time has elapsed.
The strategies mentioned above for maintaining organization with captured data are a game-changer in the world of an automotive diagnostician. Don’t take my word for it; give it a try. At first, it may seem tedious and a hindrance to productivity. But, in no time at all, you’ll realize the power of organizing captured data.
